Vue
介绍
Vue 是一款用于构建用户界面的 渐进式 JavaScript 框架。它基于标准 HTML CSS 和 JavaScript 构建,并提供了一套 声明式 的、组件化 的编程模型,帮助你高效地开发用户界面。
声明
Vue 有极其完备的文档:https://cn.vuejs.org/
根据文档可以快速上手,解决问题,集成生态。
本文档仅从个人角度介绍 Vue 的常见应用与问题, 文档demo仓库:https://github.com/chenrui1996/vue-demo。
详细文档请参考官网。
渐进式框架
Vue 是一个框架,也是一个生态。其功能覆盖了大部分前端开发常见的需求。
但 Web 世界是十分多样化的,不同的开发者在 Web 上构建的东西可能在形式和规模上会有很大的不同。
考虑到这一点,Vue 的设计非常注重灵活性和“可以被逐步集成”这个特点。
根据你的需求场景,你可以用不同的方式使用 Vue:
- 无需构建步骤,渐进式增强静态的
HTML. - 在任何页面中作为
Web Components嵌入 - 单页应用 (SPA)
- 全栈 / 服务端渲染 (SSR)
- Jamstack / 静态站点生成 (SSG)
- 开发桌面端、移动端、WebGL,甚至是命令行终端中的界面
常见前端渲染方式
| 渲染方式 | 简介 | 应用场景示例 |
|---|---|---|
| SSR(服务端渲染) | 页面 HTML 在服务器生成,浏览器接收到完整 HTML 再显示 | Razor Pages、Blazor Server |
| CSR(客户端渲染) | 后端仅返回数据,页面结构和渲染逻辑在浏览器中由 JavaScript 执行 | Vue/React SPA |
| SSG(静态站点生成) | 编译时生成静态 HTML,部署时直接提供 | Nuxt 静态模式、Jekyll |
| ISR(增量静态生成) | 静态页面支持按需重新生成,结合 SSG 与 SSR 的优点 | Next.js ISR 模式 |
| 混合渲染(Hybrid) | 某些页面 SSR,某些页面 CSR,结合使用 | Nuxt、Next.js 支持按路由配置 |
| Prerender(预渲染) | 构建阶段预先执行 JS,生成 HTML 快照 | Vue Prerender 插件 |
vue2 与 vue3
- Vue 2 已在 2023 年 12 月 31 日到达它的截止维护日期。在此之后,Vue 2 在已有的分发渠道 (各类 CDN 和包管理器) 中仍然可用,但不再进行更新,包括对安全问题和浏览器兼容性问题的修复等。
- 大部分 Vue 3 重要的特性移植回了 Vue 2.7,包括组合式 API 和
<script setup>。如果打算留在 Vue 2,应该至少升级至 2.7。 - Vue 2 升级到vue3参考 vue3迁移指南
- Vue 3 提供了更小的包体积、更好的性能、更好的可扩展性和更好的 TypeScript/IDE 支持。但Vue 3 用到了一些 IE11 不支持的现代 JavaScript 特性。
- vue 3 相对vue 2的优化
- Vue 3 重写了虚拟 DOM,使其更快、更轻量,内存占用更低。Patch 过程更高效,diff 算法更智能。
- Vue 3 使用模块化架构,支持
Tree-shaking,打包时可以剔除未使用的功能,减小体积。 - 核心库比 Vue 2 更轻量(压缩后约 10KB 左右,比 Vue 2 小约 50%)。
- 编译器能更好地标记静态节点,减少运行时开销。
- Vue 3 使用
Proxy代替 vue 2中的Object.defineProperty(无法监听数组索引、新增属性等) 实现响应式,能监听几乎所有操作,包括新增、删除、嵌套属性变更等。 Composition API替代Options API的局限性。- Vue 3 重写代码为 TypeScript,原生支持,开发体验更好。
- ref,
reactive,computed,watch,watchEffect等新的响应式工具函数。provide/inject更适合逻辑复用。
vue3 使用注意事项
- 在
<script setup>中,this 是 undefined。<script setup>是组合式 API 的编译糖,它不创建组件实例上下文,所以 this 根本不存在。<script setup>是编译阶段处理的语法糖,它相当于直接把变量写在 setup() 函数体中。在模块严格模式下普通函数this绑定undefined。(非严格模式是window) - 生命周期钩子用组合式 API 替代
- Vue 2 中通过 data 创建响应式属性,但 Vue 3 用的是 ref 和 reactive。
- Vue 3 不推荐 mixins,推荐用组合函数(useXXX)来复用逻辑
创建应用
准备工作
node.js
Node.js 是一个免费、开源、跨平台的 JavaScript 运行时环境,
它允许开发者在服务器端使用 JavaScript 编写应用程序,从而实现前后端统一的开发语言。
- 核心特点
- 事件驱动与非阻塞 I/O:Node.js 采用单线程架构,结合事件循环机制和异步 I/O 操作,能够高效地处理大量并发连接,适用于 I/O 密集型应用,如 Web 服务器和实时通信工具。
- 高性能:得益于 V8 引擎的优化,Node.js 在执行 JavaScript 代码时表现出色,适合构建高性能的网络应用。
- 丰富的生态系统:通过内置的 npm(Node Package Manager),开发者可以方便地安装和管理第三方模块,加速开发流程。
- 跨平台支持:Node.js 可在 Windows、Linux 和 macOS 等多个操作系统上运行,适应多样化的部署需求。
Vue中为什么要使用node.js1. 开发工具链依赖 Node.js
- Vue CLI / Vite:官方脚手架工具(如 Vue CLI 或 Vite)需要 Node.js 环境来初始化项目、管理依赖和运行开发服务器。
- 热重载(HMR):开发时的模块热更新依赖 Node.js 提供的本地服务器能力。
- 构建工具:webpack、Rollup 或 Vite 等工具需要 Node.js 执行代码打包、压缩、转译等操作
2. npm/yarn/pnpm 包管理
- Vue 生态系统的大量第三方库(如 vue-router、pinia、axios)通过 npm/yarn 安装,这些工具基于 Node.js。
3. 前端工程化需求
- 模块化开发:Node.js 支持 ES Modules/CommonJS,方便组织现代前端代码。
- 编译转换:Vue 单文件组件(.vue)需要 vue-loader 或 @vitejs/plugin-vue 转译为浏览器可执行的 JS,这需要 Node.js 环境。
- 预处理语言:Sass/Less/TypeScript 等需通过 Node.js 工具链编译。
4. 服务端渲染(SSR)
- 使用 Nuxt.js 或直接配置 Vue SSR 时,需要 Node.js 作为服务器渲染 Vue 组件并返回 HTML,提升首屏性能和 SEO。
5. API 代理与 Mock 数据
- 开发时可通过 Node.js 服务器代理 API 请求,解决跨域问题(如 vite.config.js 中的 proxy 配置)。
- 使用 Mock.js 等工具模拟后端接口。
6. 自动化与脚本
- 通过 Node.js 编写脚本处理重复任务(如批量生成组件、部署前优化等)。
- 可不可以不用 Node.js
- 直接引入:直接下载最新版本,通过
<script>标签引入Vue,或直接引入CDN, 适合简单页面或学习,但无法享受工程化优势。 - 静态生成:使用 Vue 构建纯静态站点(如通过 vitepress)后,生产环境只需静态服务器(如 Nginx)。
- 直接引入:直接下载最新版本,通过
webpack
Webpack 是一个功能强大的前端构建工具和模块打包器,广泛应用于现代 JavaScript 应用程序的开发中。
它能够将项目中的各种资源(如 JavaScript、CSS、图片等)视为模块,构建出清晰的依赖关系图,并将这些模块打包成可供浏览器使用的静态文件。
核心概念
- 入口(Entry)
入口指示 Webpack 应该从哪个模块开始构建依赖图。默认情况下,Webpack 会从
./src/index.js作为入口。javascriptmodule.exports = { entry: './src/index.js', };对于多页面应用,可以指定多个入口点。
- 输出(Output)
输出配置告诉 Webpack 如何命名和存储打包后的文件。
javascriptmodule.exports = { output: { filename: 'bundle.js', path: path.resolve(__dirname, 'dist'), }, };filename指定输出文件的名称,path指定输出目录的绝对路径。- 加载器(Loaders)
加载器使 Webpack 能够处理非 JavaScript 文件,如 CSS、图片等。它们在模块加载时进行转换,使这些资源能够被添加到依赖图中。
javascriptmodule.exports = { module: { rules: [ { test: /\.css$/, use: ['style-loader', 'css-loader'], }, ], }, };上述配置允许 Webpack 处理
.css文件,并将其注入到 JavaScript 中。- 插件(Plugins)
插件用于执行范围更广的任务,如打包优化、资源管理、环境变量注入等。
javascriptconst HtmlWebpackPlugin = require('html-webpack-plugin'); module.exports = { plugins: [ new HtmlWebpackPlugin({ template: './src/index.html' }), ], };HtmlWebpackPlugin插件会根据提供的模板生成一个 HTML 文件,并自动引入打包后的资源。- 模式(Mode)
Webpack 提供了三种模式:
development、production和none。设置不同的模式会启用相应的优化。javascriptmodule.exports = { mode: 'development', // 或 'production'、'none' };development:启用有利于开发的设置,如未压缩的输出和详细的错误信息。production:启用优化设置,如代码压缩和性能提升。
Vue CLI(基于 Webpack)
Vue CLI(Command Line Interface)是 Vue.js 官方提供的脚手架工具,旨在帮助开发者快速搭建和管理 Vue 项目。
Vue CLI 现已处于维护模式! 现在官方推荐使用 create-vue 来创建基于 Vite 的新项目。 另外请参考 Vue 3 工具链指南 以了解最新的工具推荐。
创建一个 Vue 应用
- 需要安装 Node.js
若本地需要多个版本的Node.js,可以使用 NVM 管理
Vue 和 Node.js 版本
| Vue 版本 | 推荐 Node.js 版本 | 构建工具建议 | 生命周期状态 |
|---|---|---|---|
| Vue 2.x | 10 – 16 | Vue CLI 4.x | 已停止维护 |
| Vue 3.x | 18.3 及以上 | Vite / Vue CLI 4.5+ | 活跃维护中 |
- 需要安装
create-vue(默认集成了Vite作为构建工具的Vue官方提供的脚手架工具)
如未安装建议全局安装
npm install -g create-vue@latest
创建步骤
- 运行以下命令
npm create vue@latest可选功能提示:
◇  请输入项目名称:
│  vue-demo
│
◆  请选择要包含的功能: (↑/↓ 切换,空格选择,a 全选,回车确认)
│  ◻ TypeScript
│  ◻ JSX 支持
│  ◻ Router(单页面应用开发)
│  ◻ Pinia(状态管理)
│  ◻ Vitest(单元测试)
│  ◻ 端到端测试
│  ◻ ESLint(错误预防)
│ ◻ Prettier(代码格式化)- 安装依赖
cd <your-project-name>
npm install- 启动开发服务器
cd <your-project-name>
npm run dev- 发布到生产环境
npm run build目录结构分析
my-vue-app/
├── node_modules/
├── public/
│   ├── favicon.ico
│   └── index.html
├── src/
│   ├── assets/
│   ├── components/
│   ├── App.vue
│   └── main.js
├── .gitignore
├── babel.config.js
├── package.json
├── README.md
└── vue.config.js (可选)
node_modules/
- 自动生成的依赖文件夹,存放项目用到的所有 npm 包。
- 不需要手动更改内容,通常不提交到 Git 仓库。
public/
- 存放静态资源,打包时内容原样拷贝到最终的构建目录 (
dist)。
| 文件/目录 | 说明 |
|---|---|
index.html | 入口 HTML 模板,Vue 应用会挂载在这里的 <div id="app"></div> 中。你可以自定义头部内容。 |
favicon.ico | 网站图标,可替换。 |
src/
- 项目源码目录,是开发的主要区域。
| 文件/目录 | 说明 |
|---|---|
main.js | 应用入口文件,创建 Vue 实例并挂载到 #app。通常在此注册全局组件、插件等。 |
App.vue | 根组件,通常作为整个应用的框架壳,里面包含 <router-view> 或页面结构。 |
components/ | 存放 Vue 单文件组件(.vue),如按钮、表单、模块等 UI 单元组件。 |
assets/ | 存放静态资源,如图片、字体等,会被 Webpack 处理(例如 hash 命名)。 |
- 若启用 Vue Router / Vuex,CLI 可能还会添加这些目录:
| 目录 | 用途 |
|---|---|
views/ | 路由页面组件(每个页面一个 .vue 文件) |
router/ | Vue Router 配置文件,通常是 index.js,包含路由表。 |
store/ | Vuex 状态管理目录。 |
- 配置文件
| 文件名 | 作用 |
|---|---|
.gitignore | 配置 Git 忽略哪些文件(如 node_modules/) |
package.json | 描述项目及依赖、脚本等信息。最核心的项目配置文件。 |
babel.config.js | Babel 配置,用于转译 JavaScript 新语法。 |
vue.config.js | Vue CLI 配置文件,可配置打包路径、代理、Webpack 设置等。 |
README.md | 项目说明文档,可填写使用方法、目录说明、运行步骤等。 |
运行过程
在 Web 服务器中(如 Apache、Nginx、Vite 的 dev server),访问目录时会默认查找 index.html 作为入口文件。
构建过程
基础
模板语法
Vue 使用一种基于 HTML 的模板语法,使我们能够声明式地将其组件实例的数据 绑定到呈现的 DOM 上。
所有的 Vue 模板都是语法层面合法的 HTML,可以被符合规范的浏览器和 HTML 解析器解析。
在底层机制中,Vue 会将模板编译成高度优化的 JavaScript 代码。
结合响应式系统,当应用状态变更时,Vue 能够智能地推导出需要重新渲染的组件的最少数量,并应用最少的 DOM 操作。
| 功能 | 语法 |
|---|---|
| 插值 | { { message } } |
| 属性绑定 | :href="url" |
| 事件绑定 | @click="handleClick" |
| 双向数据绑定 | v-model="message" |
| 动态 class | :class="{ active: isActive }" |
| 动态 style | :style="{ color: textColor }" |
- 应用示例:
<script setup>
import { ref } from 'vue'

const message = ref('Hello Vue!')
const url = ref('https://vuejs.org')
const isVisible = ref(true)
const items = ref(['苹果', '香蕉', '橘子'])
const isActive = ref(true)
const textColor = ref('blue')

function handleClick() {
  alert('按钮被点击了!')
}
</script>

<template>
  <!-- 插值语法 -->
  <h1>{{ message }}</h1>

  <!-- 双向绑定 -->
  <input v-model="message" placeholder="修改 message" />

  <hr/>

  <!-- 属性绑定 -->
  <a :href="url" target="_blank">访问链接</a>

  <hr/>
  <!-- 条件渲染 -->
  <input v-model="isVisible" type="checkbox" />

  <p v-if="isVisible" style="display: inline-block;">这个段落是可见的。</p>
  <p v-else style="display: inline-block;">这个段落是不可见的。</p>

  <hr/>

  <!-- 列表渲染 -->
  <ul>
    <li v-for="(item, index) in items" :key="index">
      {{ index + 1 }} - {{ item }}
    </li>
  </ul>

  <hr/>

  <!-- 事件处理 -->
  <button v-on:click="handleClick">点击我</button>
  <button @click="handleClick">点击我</button>

  <hr/>

  <!-- 绑定 class 和 style -->
  <!-- 插值语法不起作用,插值语法不会被当作属性解析 -->
  <p :class="{ active: isActive }" :style="{ color: textColor }">
    动态 class 和 style 示例
  </p>
</template>

<style lang="sass" scoped>

</style>- 渲染流程
- 模板编译
在开发时,你写的:
<h1>{{ message }}</h1>Vue 编译器会将其转换为类似这样的 JavaScript 渲染函数(伪代码):
function render(ctx) {
  return h('h1', null, ctx.message)
}h()是 Vue 创建虚拟 DOM 的函数(Hyperscript)ctx是组件实例的上下文,里面包含了message
⚠️ 注意:Vue 3 的模板在构建阶段由
@vue/compiler-dom预编译成render函数,这样运行时就更高效。
- 响应式绑定(Reactivity)
Vue 使用响应式系统(基于 Proxy)追踪依赖:
const message = ref('Hello')当组件第一次渲染时,Vue 会把 message 读取过程记录为依赖。
当你修改它:
message.value = 'Hi'Vue 会触发对应的渲染函数再次执行,生成新的 VNode 树(虚拟 DOM)。
- 虚拟 DOM 比较(Diff)和 Patch
每次响应式数据变动时,Vue 会:
- 使用新的数据生成新的虚拟 DOM(VNode)
- 与旧的虚拟 DOM 进行 diff 比较
- 通过最小化更新操作,打补丁到真实 DOM 上(patch)
优点:性能高,不需要完全重新渲染 DOM,只更新变动的部分。
- 注意事项
- 插值语法不能用于 HTML 属性
<!-- 错误 -->
<a href="{{ url }}">点击</a> <!-- 不会解析 -->

<!-- 正确 -->
<a :href="url">点击</a>
插值 只能用于元素内容,不能用于属性。
v-bind简写为:,v-on简写为@
<!-- 完整写法 -->
<img v-bind:src="imageUrl">
<button v-on:click="submit">提交</button>

<!-- 推荐写法 -->
<img :src="imageUrl">
<button @click="submit">提交</button>- 模板中不能使用 JavaScript 语句
<!-- 错误 -->
<p>{{ if (ok) { return 'yes' } }}</p>

<!-- 正确(表达式可以) -->
<p>{{ ok ? 'yes' : 'no' }}</p>只能写表达式,不能写完整语句(如 if、for、while、return 等)。
- 双向绑定 (
v-model) 只能用于表单元素
<!-- 正确 -->
<input v-model="username" />

<!-- 错误 -->
<!-- v-model 不能用在 <div>、<p> 等非表单元素上 -->
<div v-model="username"></div>- 绑定 class/style 推荐使用对象或数组语法
<!-- 推荐 -->
<p :class="{ active: isActive }"></p>
<p :style="{ color: textColor }"></p>

<!-- 不推荐 -->
<p class="{{ isActive ? 'active' : '' }}"></p> <!-- 无效 -->- 根节点只能有一个(在 Vue 2)
- Vue 2:模板只能有一个根元素(如
<div>) - Vue 3:允许多个根节点
- HTML 会被自动转义,除非使用
v-html
<!-- 渲染为字符串 -->
<p>{{ '<strong>hello</strong>' }}</p>

<!-- 渲染为 HTML -->
<p v-html="htmlContent"></p>
使用
v-html时注意防止 XSS 攻击。
响应式基础
Vue 的 响应式系统 是其核心特性之一,能够让 数据 和 视图 保持同步。当数据变化时,视图会自动更新。
- 应用示例(Vu3):
<script setup>
import { ref, onMounted } from 'vue'

onMounted(() => {
})

const count = ref(0);

function increment() {
  //js中用.value
  count.value++
}

const person = ref({
  name: 'Seven Chen',
  age: 28,
  child:{
    name: 'Little Seven Chen',
    age: 9,
  }
});

function incrementAge() {
  //js中用.value
  //包装在第一层
  person.value.age++
}

function incrementChildAge() {
  //js中用.value
  //包装在第一层
  person.value.child.age++
}

const personList = ref([
{
  name: 'SC',
  age: 30,
  child:[
  {
    name: 'LSC',
    age: 10,
  }]
},
{
  name: 'SCA',
  age: 31,
  child:[
  {
    name: 'LSCA1',
    age: 11,
  }]
}
])

function decreaseListAge(){
  personList.value.forEach(person => {
    person.age --
    if(person.child){
      person.child.forEach(child => {
        child.age--
      })
    }
  })
}

function incremenListtAge(){
  personList.value.forEach(person => {
    person.age ++
    if(person.child){
      person.child.forEach(child => {
        child.age++
      })
    }
  })
}

function removePerson(){
  personList.value.forEach(person => {
    if(person.child){
      person.child.pop()
    }
  })
}

function addPerson(){
  personList.value.forEach(person => {
    if(person.child){
      person.child.push({
        name: 'ADD',
        age: 11,
      })
    }
  })
}
</script>

<template>
  <el-card >
    <template #header>ref 创建响应式变量</template>

    <!-- template中用变量本身 -->
    <button @click="count--">-</button>
    <span style="margin: 0 10px;">{{count}}</span>
    <button @click="increment">+</button>
  </el-card>
  <br/>
  <el-card >
    <template #header>ref 创建响应式对象</template>

    <!-- template中用变量本身 -->

    <p>{{ person.name }}</p>
    <button @click="person.age--">-</button>
    <span style="margin: 0 10px;">{{ person.age }}</span>
    <button @click="incrementAge">+</button>

    <p>{{ person.child.name }}</p>
    <button @click="person.child.age--">-</button>
    <span style="margin: 0 10px;">{{ person.child.age }}</span>
    <button @click="incrementChildAge">+</button>
    <p>{{ person }}</p>
  </el-card>
  <br/>
  <el-card >
    <template #header>ref 创建响应式对象数组</template>

    <!-- template中用变量本身 -->
    <p>操作属性</p>
    <button @click="decreaseListAge">-</button>
    <button @click="incremenListtAge">+</button>
    <p>操作对象</p>
    <button @click="removePerson">-</button>
    <button @click="addPerson">+</button>
    <p>{{ personList }}</p>
  </el-card>
</template>


<style scoped>

</style>
注意
- vue 2或选项式风格只需要将数据放进data里即可: 比如
export default {
  data() {
    return {
      count: 1
    }
  },

  // `mounted` 是生命周期钩子,之后我们会讲到
  mounted() {
    // `this` 指向当前组件实例
    console.log(this.count) // => 1

    // 数据属性也可以被更改
    this.count = 2
  }
}- 新项目(Vue 3.2+)推荐使用
<script setup>替换setup(),旧项目只能使用setup()
import { ref } from 'vue'

export default {
  // `setup` 是一个特殊的钩子,专门用于组合式 API。
  setup() {
    const count = ref(0)

    // 将 ref 暴露给模板
    return {
      count
    }
  }
}
<script setup>功能 | 编译阶段做了什么 |
|---|---|
自动调用 setup() | Vue 自动把你写的顶层变量、函数等封装进 setup() 中 |
自动 return 所有顶层绑定 | 所有变量/函数都自动暴露给模板,无需手动 return |
| 支持宏函数 | 编译时识别 defineProps、defineEmits、defineExpose 等特殊语法 |
| 更好支持类型推导 | 尤其在 TypeScript 中,变量作用域明确,无需解构重赋值 |
| 模块提升 | 顶层导入/定义提升出 setup(),避免重复创建对象 |
- 可以通过 shallow ref 来放弃深层响应性。对于浅层 ref,只有 .value 的访问会被追踪。用于避免对大型数据的响应性开销来优化性能、或者有外部库管理其内部状态的情况。
- 只有代理对象是响应式的,更改原始对象不会触发更新。因此,使用 Vue 的响应式系统的最佳实践是仅使用你声明对象的代理版本。
  const raw = {}
  const proxy = reactive(raw)

  // 代理对象和原始对象不是全等的
  console.log(proxy === raw) // false

  const raw1 = {}
  const proxy1 = ref(raw1)

  // 代理对象和原始对象不是全等的
  console.log(proxy1 === raw1) // false
  console.log(proxy1.value === raw1) // false
reactive() 的局限性
- 只能用于对象类型 (对象、数组和如 Map、Set 这样的集合类型)。它不能持有如 string、number 或 boolean 这样的原始类型。
- 不能轻易地“替换”响应式对象,因为这样的话与第一个引用的响应性连接将丢失
ref 替换 .value: 本体不变(响应系统依然追踪).value 被 Vue 响应式代理,替换后视图自动更新
reactive 替换整个变量:user = {...} 其实是给 user 变量赋了新值, 原有的响应式追踪对象已经断开,新值不是响应式的
如果必须使用 reactive,应修改属性而非替换对象
jslet replace1 = reactive({ count1: 0 }) function replaceReactive() { replace1 = { summer: replaceCounter++ } // 旧引用失效,原有响应断裂 } let replace2 = ref({ count2: 0 }) function replaceRef() { replace2.value = { summer: replaceCounter++ } // 没有问题,视图正常更新 }- 将响应式对象的原始类型属性解构为本地变量时,或者将该属性传递给函数时,将丢失响应性连接
无论是reactive还是ref,只要解构对象内部属性,拿到的都是值类型,因此所拿到的变量与原对象不再有关联。
如果需要结构后的变量具有响应式,使用"toRefs()"
ref解决 结构/解构响应性丢失 的问题是指以 ref为整体时保持响应式
jsconst state = reactive({ count: 0 }) // 当解构时,count 已经与 state.count 断开连接 let { count } = state // 不会影响原始的 state count++ // 该函数接收到的是一个普通的数字 // 并且无法追踪 state.count 的变化 // 我们必须传入整个对象以保持响应性 callSomeFunction(state.count)
reactive 与 ref 如何选择
reactive 替换对象会丧失响应式(新对象如果不是响应式可能会存在问题),ref 监听时默认不开启深度监听
两个都不是严重的缺陷,建议统一使用规范。要么对象都用reactive(对 对象属性重新赋值),值都用ref;要么都用ref(watch时开启深度监听)。
- 实现原理:
Vue 2 和 Vue 3 的响应式系统实现原理有根本性区别,主要体现在:
- Vue 2:基于 Object.defineProperty(运行时劫持)
- Vue 3:基于 Proxy(编译时可拓展的代理)
Vue 2 响应式原理(基于
Object.defineProperty)- Vue 会递归遍历对象的每个属性
- 使用
Object.defineProperty劫持每个属性的 getter 和 setter - 在 getter 中收集依赖(Dep)
- 在 setter 中触发更新(通知 Watcher)
存在的问题:
- 只能监听属性,不支持数组索引或新增属性
- 深层对象要递归遍历所有字段,性能差
- 无法检测
arr[0] = xxx或obj.newProp = 123
- Vue 3 响应式原理(基于
Proxy)
当 ref 的值是一个对象时,ref() 会在内部调用 reactive。
- 使用
Proxy代理整个对象,而不是单个属性 - 在
get拦截器中自动收集依赖 - 在
set拦截器中自动触发更新 - 响应式追踪通过全局的
effect()机制实现
优点:
- 支持 数组索引、新增属性、删除属性等全部操作
- 惰性代理(不递归)性能更好
- 更好支持 Map、Set、WeakMap 等复杂数据结构
| 特性 | Vue 2 (defineProperty) | Vue 3 (Proxy) |
|---|---|---|
| 支持新增/删除属性 | ❌ 需要 Vue.set | ✅ 原生支持 |
| 深度嵌套性能 | ❌ 初始化时全递归 | ✅ 惰性递归,按需劫持 |
| 支持数组索引响应 | ❌ 不完全 | ✅ 完全支持 |
| 支持 Map/Set | ❌ 不支持 | ✅ 支持 |
| 数据追踪能力 | 一对多(Dep -> Watcher) | 多对多(targetMap) |
| 实现方式 | 运行时遍历属性 | 编译期生成 Proxy |
Vue 3 在访问对象内部属性之前,不会递归劫持它的子对象。只有在你访问的时候才会代理它。
计算属性
计算属性是 Vue 提供的一种基于其响应式系统的特性,它允许我们根据已有的响应式数据声明式地计算出新的值,并在依赖项变更时自动更新结果。
只有依赖的数据发生改变时才会重新计算。
- 应用示例(Vu3)
<template>
  <el-card >
    <template #header>基本用法</template>

    <!-- template中用变量本身 -->
    <p>姓:{{ lastName }}</p>
    <p>名:{{ firstName }}</p>
    <p>姓名(计算属性):{{ fullName }}</p>
    <p>姓名(方法):{{ (() => { return `${lastName} ${firstName} `})() }}</p>
    <el-button @click="generateName">随机生成姓名</el-button>

    <p>姓名(可写计算属性):{{ fullNameWriteable }}</p>
    <el-button @click="generateFullName">随机生成姓名-写入计算属性</el-button>

    <p>姓名(生成记录):{{ previousName }}</p>
  </el-card>
  <br/>
</template>

<script setup lang="ts">
import { ref, computed, onMounted } from 'vue';
import { fakerZH_CN as faker } from '@faker-js/faker'

const firstName = ref('')
const lastName = ref('')

const previousName = ref('')

onMounted(() => {
  firstName.value = faker.person.firstName() // 名
  lastName.value = faker.person.lastName()  // 姓
})

// 计算属性
const fullName = computed((previous) => {
  previousName.value = String(previous)
  return `${lastName.value} ${firstName.value} `
})

function generateName(){
  firstName.value = faker.person.firstName() // 名
  lastName.value = faker.person.lastName()  // 姓
}

const fullNameWriteable = computed({
  get(previous) {
    previousName.value = String(previous)
    return `${lastName.value} ${firstName.value}`
  },

  set(newValue) {
    // 注意:我们这里使用的是解构赋值语法
    [firstName.value, lastName.value] = String(newValue).split(' ')
  }
})

function generateFullName(){
  fullNameWriteable.value = `${faker.person.firstName()} ${faker.person.lastName()}`
}

</script>

<style scoped>

</style>
注意
- vue2 写法
export default {
  data() {
    return {
      author: {
        name: 'John Doe',
        books: [
          'Vue 2 - Advanced Guide',
          'Vue 3 - Basic Guide',
          'Vue 4 - The Mystery'
        ]
      }
    }
  },
  computed: {
    // 一个计算属性的 getter
    publishedBooksMessage() {
      // `this` 指向当前组件实例
      return this.author.books.length > 0 ? 'Yes' : 'No'
    }
  }
}- 将同样的函数定义为一个方法而不是计算属性,两种方式在结果上确实是完全相同的,不同之处在于计算属性值会基于其响应式依赖被缓存。 这也解释了为什么下面的计算属性永远不会更新,因为 Date.now() 并不是一个响应式依赖:
const now = computed(() => Date.now())条件渲染
条件渲染(Conditional Rendering) 是控制模板中元素是否显示的关键技术。它基于 JavaScript 表达式的真假值,动态地插入或移除 DOM 元素,从而实现灵活的界面交互。
- 应用示例(Vu3)
<template>
  <el-card >
    <template #header>v-if</template>

    <p v-if="loggedIn">欢迎回来!</p>
    <p v-else>请先登录。</p>
    <el-button @click="loggedIn = !loggedIn">切换登录状态</el-button>
  </el-card>
  <br/>
  <el-card >
    <template #header>v-show</template>

    <p v-show="toggle">这段话只是被 display:none 了</p>
    <el-button @click="toggle = !toggle">显示 / 隐藏</el-button>
  </el-card>
</template>

<script setup>
import { ref} from 'vue';

const loggedIn = ref(false)

const toggle = ref(true)

</script>

<style scoped>

</style>
v-if 与 v-show 的选择比较
| 对比点 | v-if | v-show |
|---|---|---|
| 渲染策略 | 按需创建/销毁 DOM 元素 | 创建一次,之后仅切换 display |
| 初始渲染开销 | 较大(每次条件变更都重新渲染) | 较小(始终存在) |
| 适合场景 | 频繁切换不建议,适合条件变化较少的内容 | 适合频繁切换可见性的内容(如 Tab 切换) |
| DOM 保留状态 | 被销毁,状态丢失 | 状态保留 |
注意
- 不能同时使用 v-if 和 v-for 在同一元素上
可读性差,容易误解优先级。会误认为先判断 v-if 再遍历。实际是先遍历,再判断是否渲染。
<!-- 不推荐 -->
<li v-for="item in list" v-if="item.visible">{{ item.name }}</li>

<!-- 推荐方式 -->
<li v-for="item in list" v-show="item.visible">{{ item.name }}</li>

<!-- 或者 -->

const visibleItems = computed(() => list.value.filter(item => item.visible))- v-else 和 v-else-if 必须紧跟 v-if 元素
- v-show 不影响 v-if 的渲染逻辑
列表渲染
- 应用示例(Vu3)
<template>
<el-card >
<template #header>v-for 遍历数组</template>
<ul>
<li v-for="(airline, i) in airlines" :key="i">{{ i }} - {{ airline }}</li>
</ul>
<el-button @click="generateAirlines">随机生成飞机</el-button>
</el-card>
<br/>
<el-card >
<template #header>v-for 遍历对象</template>
<ul>
<li v-for="(value, key) in person" :key="key">
<template v-if="getType(value) === 'Object'">
{{ key }}:
<ul>
<li v-for="(value, key) in value" :key="key">{{ key }}: {{ value }}</li>
</ul>
</template>
<template v-else>
{{ key }}: {{ value }}
</template>
</li>
</ul>
<el-button @click="generatePerson">随机生成人员信息</el-button>
</el-card>
<br/>
<el-card >
<template #header>v-for 遍历指定次数 <el-tag>win + 。可以输入表情</el-tag></template>
<el-button @click="generateNumber">随机n个😶🌫️</el-button>
<div>
<span v-for="n in number" :key="n">😶🌫️</span>
</div>
</el-card>
<br/>
</template>
<script setup>
import { ref, onMounted } from 'vue';
import { fakerZH_CN as faker } from '@faker-js/faker'
import { getType } from '@/common'
const airlines = ref([])
const person = ref({})
const number = ref(0)
onMounted(() => {
generateAirlines()
generatePerson()
generateNumber()
});
function generateAirlines(){
airlines.value.length = 0;
for (let index = 0; index < 10; index++) {
airlines.value.push(faker.airline.airline())
}
}
function generatePerson(){
person.value = {
id: faker.string.uuid(),
fullName: faker.person.fullName(),
gender: faker.person.sexType(),
birthday: faker.date.birthdate({ min: 18, max: 65, mode: 'age' }),
email: faker.internet.email(),
phone: faker.phone.number(),
address: {
country: faker.location.country(),
city: faker.location.city(),
street: faker.location.streetAddress(),
zipCode: faker.location.zipCode(),
},
avatar: faker.image.avatar(),
job: {
title: faker.person.jobTitle(),
type: faker.person.jobType(),
area: faker.person.jobArea(),
},
}
}
function generateNumber(){
number.value = Math.floor(Math.random() * 100) + 1
}
</script>
<style scoped>
</style>注意
- 使用唯一的 ID 作为 key,不要使用数组索引,尤其是列表会增删排序的情况。
- 不要同时使用 v-if 和 v-for。必要时使用template元素过渡。
事件处理
事件处理是响应用户交互(如点击、输入、提交等)最常用的方式之一。Vue 提供了简单直观的语法来绑定 DOM 事件,并执行相应的处理逻辑。
事件修饰符列表
.stop:单击事件将停止传递.prevent:阻止默认行为,如表单提交,链接跳转等.self:仅当 event.target 是元素本身时才会触发事件处理器.capture:在被内部元素处理前,先被外部(parent)处理.once:点击按钮只触发一次.passive:被动监听 例如被动监听滚动(不会阻止默认滚动),一般用于触摸事件的监听器,可以用来改善移动端设备的滚屏性能。
键盘事件列表
.enter.tab.delete (捕获“Delete”和“Backspace”两个按键).esc.space.up.down.left.right.ctrl.alt.shift.meta
鼠标事件列表
.left.right.middle
自定义事件 可以使用"emit"实现自定义事件
应用示例(Vu3)
<template>
  <el-card >
    <template #header>基本用法</template>
    <!-- 方法处理 -->
    <p>方法事件处理器</p>
    <el-button @click="sayHello">点击问好</el-button>

    <!-- 内联事件处理器 -->
    <p>内联事件处理器 当前计数:{{ count }}</p>
    <el-button @click="count++">+</el-button>

    <!-- 内联事件处理器调用方法 -->
    <p>内联事件处理器调用方法</p>
    <el-button @click="sayMessage('四十二号混凝土')">点击弹框</el-button>

    <!-- 在内联事件处理器中访问事件参数 -->
    <p>在内联事件处理器中访问事件参数</p>
    <!-- 使用特殊的 $event 变量 -->
    <el-button @click="warn('Form cannot be submitted yet.', $event)">
      提交1
    </el-button>
    <!-- 使用内联箭头函数 -->
    <el-button @click="(event) => warn('Form cannot be submitted yet.', event)">
      提交2
    </el-button>
  </el-card>
  <br/>
  <el-card>
    <template #header>事件修饰符</template>
    <p>stop 单击事件将停止传递</p>
    <!-- stop单击事件将停止传递 -->
    <!-- 不会触发 -->
    <div style="height:150px;background-color: aliceblue; margin: 10px 0;" @click="parentClicked('parent3', $event)">
      <!-- 会触发 -->
      <div style="height:100px;background-color: aquamarine;" @click.stop="parentClicked('parent2', $event)">
        <!-- 会触发 -->
        <div style="height:60px;background-color: aqua;" @click="parentClicked('parent1', $event)">
          <el-button @click="handleSelfClick">点击按钮</el-button>
          <br/>
          parent1
        </div>
        parent2
      </div>
      parent3
    </div>
    <el-divider/>

    <p>self 仅当 event.target 是元素本身时才会触发事件处理器</p>
    <!-- self 仅当 event.target 是元素本身时才会触发事件处理器 -->
    <!-- 例如:事件处理器不来自子元素 -->
    <!-- 不会触发 -->
    <div style="height:100px;background-color: aquamarine; margin: 10px 0;" @click="parentClicked('parentwithself', $event)">
      <!-- 会触发 -->
      <div  style="height:60px;background-color: aqua;" @click.self="parentClicked('parentwithoutself', $event)">
        <el-button @click="handleSelfClick">点击按钮</el-button>
        <br/>
        parentwithoutself
      </div>
      parentwithself
    </div>
    <el-divider/>

    <p>once 点击按钮只触发一次; prevent 点击按钮时阻止默认行为; 可以链式调用</p>
    <el-tag>使用 @click.prevent.self 会阻止元素及其子元素的所有点击事件的默认行为,而 @click.self.prevent 则只会阻止对元素本身的点击事件的默认行为。</el-tag>
    <form @submit.prevent="handleSubmit" style="margin: 10px 0;">
      <el-button @click.stop.once="handleClickOnce">点击我(一次性按钮)</el-button>
    </form>

    <el-divider/>

    <!-- 添加事件监听器时,使用 `capture` 捕获模式 -->
    <!-- 例如:指向内部元素的事件,在被内部元素处理前,先被外部处理 -->
    <p>使用 `capture` 捕获模式,指向内部元素的事件,在被内部元素处理前,先被外部(parent1)处理 </p>
    <div style="height:60px;background-color: aqua;margin: 10px 0;" @click.capture="parentClicked('parent1', $event)">
      <el-button @click="handleSelfClick">捕获按钮</el-button>
      <br/>
      parent1
    </div>
    <el-divider/>

    <!-- 被动监听滚动(不会阻止默认滚动)-->
    <!-- 滚动事件的默认行为 (scrolling) 将立即发生而非等待 `onScroll` 完成 -->
    <!-- 以防其中包含 `event.preventDefault()` -->
    <p>passive 被动监听 例如被动监听滚动(不会阻止默认滚动)</p>
    <p>passive 修饰符一般用于触摸事件的监听器,可以用来改善移动端设备的滚屏性能。</p>
    <div
      style="height:100px;background-color: aqua;margin: 10px 0;overflow: auto;"
      @wheel.passive="handleScroll"
    >
      <div style="height:200px;">
        <ul>
          <li>滚动我</li>
          <li>滚动我</li>
          <li>滚动我</li>
          <li>滚动我</li>
          <li>滚动我</li>
          <li>滚动我</li>
          <li>滚动我</li>
          <li>滚动我</li>
          <li>滚动我</li>
          <li>滚动我</li>
          <li>滚动我</li>
        </ul>
      </div>
  </el-card>
  <br/>
  <el-card>
    <template #header>键盘事件</template>
    <el-input
      autosize
      type="textarea"
      v-model="message"
      @keydown.enter.ctrl="submitMessage"
      @keydown.esc="cancelEdit"
      @keydown.tab.prevent="insertTab"
      placeholder="Ctrl + Enter 提交,Esc 取消,Tab 插入缩进"
    ></el-input>
    <p v-if="submitted">✅ 提交成功:{{ submitted }}</p>
  </el-card>
  <br/>
  <el-card>
    <template #header>鼠标事件</template>
    <!-- 单击事件 -->
    <p>单击事件</p>
    <el-button  @click="handleClick" style="margin:10px 0">单击我</el-button >
    <el-divider></el-divider>
    <!-- 双击事件 -->
    <p>双击事件</p>
    <el-button @dblclick="handleDoubleClick" style="margin:10px 0">双击我</el-button>
    <el-divider></el-divider>
    <!-- 按下和松开 -->
    <div
      class="box"
      @mousedown="handleMouseDown"
      @mouseup="handleMouseUp"
      style="height: 100px; margin:10px 0;background-color: cadetblue;"
    >
      {{ mouseDownUp }}
    </div>
    <el-divider></el-divider>
    <!-- 鼠标进入和离开 -->
    <div
      class="box"
      @mouseenter="handleMouseEnter"
      @mouseleave="handleMouseLeave"
      style="height: 100px; margin:10px 0;background-color: cadetblue;"
    >
      {{mouseEnterLeave}}
    </div>
    <el-divider></el-divider>
    <!-- 鼠标移动 -->
    <div
      class="box"
      @mousemove="handleMouseMove"
      style="height: 100px; margin:10px 0;background-color: cadetblue;"
    >
      鼠标移动区域,移动位置:X: {{ mouseX }}, Y: {{ mouseY }}
    </div>
  </el-card>
</template>

<script setup>
import { ref, onMounted } from 'vue';

const count = ref(0)

onMounted(() => {

});

function sayHello(){
  alert("你家人好嘛?")
}

function sayMessage(message){
  alert(message)
}

function warn(message, event) {
  // 这里可以访问原生事件
  if (event) {
    // 阻止默认行为,如表单提交链接跳转
    event.preventDefault()
    alert(`${event.srcElement.innerText} : ${message}`)
  }

}

function handleSubmit() {
  alert("表单提交被阻止!");
}

function handleClickOnce() {
  alert("你只会看到这一次!");
}

function handleSelfClick() {
  alert("你点击按钮!");
}

function parentClicked(from, event) {
  if(event.target !== event.currentTarget){
    alert(`父元素${from} 被点击(冒泡)`);
  }
  alert(`父元素${from} 被点击(本身)`);
}

function handleScroll() {
  alert("滚动事件触发");
}

const message = ref('')
const submitted = ref('')

function submitMessage() {
  if (message.value.trim()) {
    submitted.value = message.value
    message.value = ''
  } else {
    alert('内容不能为空')
  }
}

function cancelEdit() {
  message.value = ''
  alert('编辑已取消')
}

function insertTab(event) {
  const textarea = event.target
  const start = textarea.selectionStart
  const end = textarea.selectionEnd
  const value = textarea.value

  // 插入4个空格
  textarea.value = value.substring(0, start) + '    ' + value.substring(end)
  textarea.selectionStart = textarea.selectionEnd = start + 4

  // 手动触发 v-model 更新
  message.value = textarea.value
}

const mouseX = ref(0);
const mouseY = ref(0);

const mouseDownUp = ref("按下或松开鼠标")
const mouseEnterLeave = ref("鼠标进入和离开区域")

function handleClick(event) {
  alert('单击事件触发');
}

function handleDoubleClick(event) {
  alert('双击事件触发');
}

function handleMouseDown(event) {
  mouseDownUp.value = `鼠标按下`
}

function handleMouseUp(event) {
  mouseDownUp.value = `鼠标松开`
}

function handleMouseEnter(event) {
  mouseEnterLeave.value = `鼠标进入`
}

function handleMouseLeave(event) {
  mouseEnterLeave.value = `鼠标离开`
}

function handleMouseMove(event) {
  mouseX.value = event.offsetX;
  mouseY.value = event.offsetY;
}
</script>

<style scoped>

</style>
表单输入绑定
表单绑定主要通过 v-model 指令来实现,它可以双向绑定输入控件与组件的数据。
- 应用示例(Vu3)
<template>
  <el-card>
    <template #header>表单绑定</template>
    <el-form :model="form" label-width="auto" style="max-width: 600px" :rules="rules" ref="formRef">
      <el-form-item label="Activity name" prop="name">
        <el-input v-model.trim="form.name" />
      </el-form-item>
      <el-form-item label="Activity zone" prop="region">
        <el-select v-model="form.region" placeholder="please select your zone">
          <el-option label="Zone one" value="shanghai" />
          <el-option label="Zone two" value="beijing" />
        </el-select>
      </el-form-item>
      <el-form-item label="Number of participants" prop="participants">
        <el-input type="number" min="0" v-model.number="form.participants" />
      </el-form-item>
      <el-form-item label="Activity time">
        <el-col :span="11">
          <el-date-picker
            v-model="form.date1"
            type="date"
            placeholder="Pick a date"
            style="width: 100%"
          />
        </el-col>
        <el-col :span="2" class="text-center">
          <span class="text-gray-500">-</span>
        </el-col>
        <el-col :span="11">
          <el-time-picker
            v-model="form.date2"
            placeholder="Pick a time"
            style="width: 100%"
          />
        </el-col>
      </el-form-item>
      <el-form-item label="Instant delivery">
        <el-switch v-model="form.delivery" />
      </el-form-item>
      <el-form-item label="Activity type">
        <el-checkbox-group v-model="form.type">
          <el-checkbox value="Online activities" name="type">
            Online activities
          </el-checkbox>
          <el-checkbox value="Promotion activities" name="type">
            Promotion activities
          </el-checkbox>
          <el-checkbox value="Offline activities" name="type">
            Offline activities
          </el-checkbox>
          <el-checkbox value="Simple brand exposure" name="type">
            Simple brand exposure
          </el-checkbox>
        </el-checkbox-group>
      </el-form-item>
      <el-form-item label="Resources">
        <el-radio-group v-model="form.resource">
          <el-radio value="Sponsor">Sponsor</el-radio>
          <el-radio value="Venue">Venue</el-radio>
        </el-radio-group>
      </el-form-item>
      <el-form-item label="Activity form">
        <el-input v-model="form.desc" type="textarea" />
      </el-form-item>
      <el-form-item label = "Acceptthe user agreement">
        <el-checkbox v-model="form.accepted" true-value="yes" false-value="no"/>
      </el-form-item>
      <el-form-item>
        <el-button type="primary" @click="onSubmit">Submit</el-button>
        <el-button @click="onReset">Reset</el-button>
      </el-form-item>
    </el-form>

    <el-divider></el-divider>

    <p>提交结果</p>
    <p v-if="submitted">{{ form }}</p>
    <p v-else>表单正在输入</p>

  </el-card>

</template>

<script lang="ts" setup>
import { ref, reactive, watch } from 'vue'
import { FormInstance, FormRules, ElMessage} from 'element-plus'

//用于检验
const formRef = ref<FormInstance> ()
const form = reactive({
  name: '',
  region: '',
  participants: 0,
  date1: '',
  date2: '',
  delivery: false,
  type: [],
  resource: '',
  desc: '',
  accepted: 'yes'
})

const checkParticipants = (rule: any, value: any, callback: any) => {
  if (!Number.isInteger(value)) {
    callback(new Error('Please input digits'))
  } else{
    if (value > 18) {
      callback(new Error('Participants must be less than 18'))
    } else {
      callback()
    }
  }
}

const rules = reactive<FormRules>({
  name: [
    { required: true, message: 'Please input Activity name', trigger: 'blur' },
    { min: 3, max: 5, message: 'Length should be 3 to 5', trigger: 'blur' },
  ],
  region: [
    { required: true,  message: 'Please select Activity zone', trigger: 'change', }
  ],
  participants: [
    { required: true, validator: checkParticipants,  trigger: 'blur' }
  ],
})


const submitted = ref(false)

const onSubmit = async () => {
  if(!formRef.value) return;
  await formRef.value.validate((valid, fields) => {
    if (valid) {
      ElMessage({
        message: '提交成功.',
        type: 'success',
      })

      submitted.value = true;
      return
    }
    ElMessage.error('验证失败!')
  })
}

const onReset = () => {
  submitted.value = false
  form.name= '',
  form.region= '',
  form.date1= '',
  form.date2= '',
  form.delivery= false,
  form.type= [],
  form.resource=  '',
  form.desc= '',
  form.accepted= 'yes'
}

watch(form, async (newValue, oldValue) => {
  submitted.value = false;
},{ deep: true })

</script>- 修饰符
.lazy默认情况下,v-model 会在每次 input 事件后更新数据 (IME 拼字阶段的状态例外)。你可以添加 lazy 修饰符来改为在每次 change 事件后更新数据:
<!-- 在 "change" 事件后同步更新而不是 "input" -->
<input v-model.lazy="msg" />.number如果你想让用户输入自动转换为数字,你可以在 v-model 后添加 .number 修饰符来管理输入:
<input v-model.number="age" />如果该值无法被 parseFloat() 处理,那么将返回原始值。特别是当输入为空时 (例如用户清空输入字段之后),会返回一个空字符串。这种行为与 DOM 属性 valueAsNumber 有所不同。
number 修饰符会在输入框有 type="number" 时自动启用。
.trim如果你想要默认自动去除用户输入内容中两端的空格,你可以在 v-model 后添加 .trim 修饰符:
<input v-model.trim="msg" />侦听器
侦听器(watcher)用于监听响应式数据的变化,从而在数据变化时执行特定的逻辑。
- 应用示例(Vu3)
<template>
<el-card >
<template #header>监听数据</template>
<el-input-number v-model="num" :min="1" :max="10" />
</el-card>
<br/>
<el-card >
<template #header>
监听对象
</template>
<el-tag type="danger" size="large" style="font-size: .8em;font-weight: bold;">once、immediate、deep 在watch注册时已经赋值,切换时需要【关闭侦听】再【开启侦听】</el-tag>
<br/>
<el-tag type="danger" size="large" style="font-size: .8em;font-weight: bold;">【关闭侦听】:使用注册watch的返回函数</el-tag>
<br/>
<div>
<span>一次回调(once)</span>  
<el-checkbox v-model="onceFlag" @change="onceFlagChange($event)"></el-checkbox>
</div>
<div>
<span>立即回调</span>  
<el-checkbox v-model="immediateFlag" @change="immediateFlagChange($event)"></el-checkbox>
</div>
<div>
<span>深层侦听</span>  
<el-checkbox v-model="deepFlag" @change="deepFlagChange($event)"></el-checkbox>  
<el-tag type="primary" size="large" style="font-size: .8em;font-weight: bold;">reactive默认开启深度监听,注册时未赋值,使用默认值,以对比展示</el-tag>
</div>
<el-divider></el-divider>
<div>
<span>监听ref对象</span>  
<el-tag type="warning" size="large" style="font-size: .8em;font-weight: bold;">ref 默认不会深度监听,需要手动使用 deep:true</el-tag>
</div>
<ul>
<li v-for="(value, key) in personRef" :key="key">
<template v-if="getType(value) === 'Object'">
{{ key }}:
<ul>
<li v-for="(v, k) in value" :key="key">{{ k }}: {{ v }}</li>
</ul>
</template>
<template v-else>
{{ key }}: {{ value }}
</template>
</li>
</ul>
<el-button @click="generatePersonRef">随机生成人员信息</el-button>
<el-button @click="updatePersonFullNameRef">随机修改人员信息</el-button>
<el-divider></el-divider>
<div>
<span>监听reactive对象 </span>  
<el-tag type="warning" size="large" style="font-size: .8em;font-weight: bold;">reactive 替换对象实例后失去响应性;但默认开启深度监听</el-tag>
</div>
<ul>
<li v-for="(value, key) in personReactive" :key="key">
<template v-if="getType(value) === 'Object'">
{{ key }}:
<ul>
<li v-for="(v, k) in value" :key="key">{{ k }}: {{ v }}</li>
</ul>
</template>
<template v-else>
{{ key }}: {{ value }}
</template>
</li>
</ul>
<el-button @click="generatePersonReactive">随机生成人员信息</el-button>
<el-button @click="updatePersonFullNameReactive">随机修改人员信息</el-button>
</el-card>
<br/>
<el-card>
<template #header>watchEffect</template>
<el-tag type="warning" size="large" style="font-size: .8em;font-weight: bold;">只会监听方法中调用的属性</el-tag>
<br/>
<el-tag type="warning" size="large" style="font-size: .8em;font-weight: bold;">相对于watch,在 watchEffect 内改变其正在监听的变量时,不会导致无限递归或循环调用。</el-tag>
<br/>
<el-tag type="warning" size="large" style="font-size: .8em;font-weight: bold;">默认开启immediate、deep</el-tag>
<br/>
<el-tag type="warning" size="large" style="font-size: .8em;font-weight: bold;">
未避免下次监听改变时 keyword 发生了变化,使用onWatcherCleanup【vue 3.5+】取消上次请求。不能在异步函数的 await 语句之后调用它
</el-tag>
<br/>
<el-tag type="warning" size="large" style="font-size: .8em;font-weight: bold;"><
onCleanup 函数还可以作为第三个参数传递给侦听器回调,以及 watchEffect 作用函数的第一个参数。
</el-tag>
<br/>
<el-tag type="warning" size="large" style="font-size: .8em;font-weight: bold;">默认异步批量触发</el-tag>
<br/>
<el-input v-model.trim="keyword" placeholder="输入关键词…" />
<p v-if="loading">加载中...</p>
<ul v-else>
<li v-for="item in results" :key="item.id">{{ item.title }}</li>
</ul>
</el-card>
</template>
<script setup>
import { ElMessage } from 'element-plus';
import { fa, fakerZH_CN as faker } from '@faker-js/faker'
import { getType } from '@/common'
import { ref, reactive, computed, onMounted, watch, watchEffect, toRef } from 'vue';
import { useWatchStore } from'@/store'
/**
* watch
*/
const store = useWatchStore()
onMounted(() => {
startWatchRef()
startWatchReactive()
});
//监听数据
const num = ref(1)
watch(num, async (newValue, oldValue) => {
ElMessage.success(`newValue: ${newValue}, oldValue: ${oldValue}`)
})
const generatePersonData = () => {
return {
fullName: faker.person.fullName(),
address: {
country: faker.location.country(),
city: faker.location.city(),
street: faker.location.streetAddress(),
zipCode: faker.location.zipCode(),
},
}
}
const onceFlag = ref(store.onceFlag)
const onceFlagChange = (value) => {
store.$patch((state) => {
state.onceFlag = value
})
stopWatchRef()
startWatchRef()
stopWatchReactive()
startWatchReactive()
}
const immediateFlag = ref(store.immediateFlag)
const immediateFlagChange = (value) => {
store.$patch((state) => {
state.immediateFlag = value
})
stopWatchRef()
startWatchRef()
stopWatchReactive()
startWatchReactive()
}
const deepFlag = ref(store.deepFlag)
const deepFlagChange = (value) => {
store.$patch((state) => {
state.deepFlag = value
})
stopWatchRef()
startWatchRef()
stopWatchReactive()
startWatchReactive()
}
//监听对象
//ref
const personRef = ref(generatePersonData())
const generatePersonRef = () => {
personRef.value = generatePersonData()
}
const updatePersonFullNameRef = () => {
personRef.value.fullName = faker.person.fullName()
personRef.value.address.city = faker.location.city()
}
let stopWatchRefTemp = null
const startWatchRef = () => {
if(stopWatchRefTemp)
return
stopWatchRefTemp = watch(personRef,
async (newValue, oldValue) =>
{
ElMessage.success(`ref watch: [newValue: ${newValue.fullName}, oldValue: ${oldValue ? oldValue.fullName : ""}]`)
},
{
deep: deepFlag.value,
once: onceFlag.value,
immediate: immediateFlag.value
}
)
}
const stopWatchRef = () => {
//调用返回函数
stopWatchRefTemp()
//清空以便下次赋值
stopWatchRefTemp = null
}
//监听对象
//reactive
let personReactive = reactive(generatePersonData())
const generatePersonReactive = () => {
//失去响应性
// personReactive = generatePersonData()
//遍历赋值不会失去响应性
let person = generatePersonData()
for(let key in person){
personReactive[key] = person[key]
}
}
const updatePersonFullNameReactive = () => {
personReactive.fullName = faker.person.fullName()
personReactive.address.city = faker.location.city()
}
let stopWatchReactiveTemp = null
const startWatchReactive = () => {
if(stopWatchReactiveTemp)
return
stopWatchReactiveTemp = watch(personReactive,
async (newValue, oldValue) =>
{
ElMessage.success(`reactive watch: [newValue: ${newValue.fullName}, oldValue: ${oldValue ? oldValue.fullName : ""}]`)
},
{
once: onceFlag.value,
immediate: immediateFlag.value
}
)
}
const stopWatchReactive = () => {
//调用返回函数
stopWatchReactiveTemp()
//清空以便下次赋值
stopWatchReactiveTemp = null
}
/**
* watchEffect
*/
const loading = ref(false)
const keyword = ref('')
//正在请求的Keyword
const requestingKeyword = ref('')
const results = ref([])
watchEffect((onInvalidate) => {
if (!keyword.value) {
results.value = []
return
}
loading.value = true
//相对于watch,虽然监听但不会无限递归
requestingKeyword.value = keyword.value
ElMessage.primary(`正在请求, keyword: ${keyword.value}`)
let canceled = false
// 未避免下次监听改变时 keyword 发生了变化
// 每次 keyword 改变时取消之前的“请求”
onInvalidate(() => {
if(loading.value){
ElMessage.error(`取消请求, keyword: ${requestingKeyword.value}`)
canceled = true
}
})
// 模拟 API 异步延时延迟
setTimeout(() => {
if (!canceled) {
// 使用 faker 生成 5 条假数据
results.value = Array.from({ length: Math.floor(Math.random() * 10) + 1 }, () => ({
id: faker.string.uuid(),
title: faker.word.words({ count: Math.floor(Math.random() * 10) + 1 })
}))
loading.value = false
ElMessage.success(`请求成功, keyword: ${keyword.value}`)
}
}, 1000 * (Math.floor(Math.random() * 10) + 1))
})
</script>
<style scoped>
</style>- 注意事项
watch
注册时其他属性:
- 一次回调(once)
- 立即回调(immediate)
- 深层侦听(deep)
once、immediate、deep 在watch注册时赋值
监听ref对象
- ref 默认不会深度监听,需要手动使用 deep:true
监听reactive对象
- 默认开启深度监听
- 注意更新时不要替换对象、数组。会丧失响应性
watchEffect
- 只会监听方法中调用的属性
- 相对于watch,在 watchEffect 内改变其正在监听的变量时,不会导致无限递归或循环调用。
- 默认开启immediate、deep
- 未避免下次监听改变时 keyword 发生了变化,使用onWatcherCleanup【vue 3.5+】取消上次请求。不能在异步函数的 await 语句之后调用它
- onCleanup 函数还可以作为第三个参数传递给侦听器回调,以及 watchEffect 作用函数的第一个参数。
- 默认异步批量触发
模板引用
模板引用(Template Refs) 是一种获取 DOM 元素或子组件实例的方式,常用于需要直接操作 DOM 或调用子组件方法的场景。
- 应用示例(Vu3)
<template>
  <el-card >
    <template #header>元素上的 ref</template>

    <input style="margin-bottom: 10px;" ref="myInput" />
    <br>
    <el-button type="primary" @click="focusInput">聚焦input</el-button>
  </el-card>
  <br/>
  <el-card >
    <template #header>组件的 ref</template>

    <!-- HTML 属性默认传入的值都是字符串类型, 特别注意使用 :(即 v-bind)绑定,否则就是字符串。 -->
    <ChildComponent :id = "1" title="子组件" ref="childRef" />
    <el-button type="primary" @click="callChildSayHollow">调用子组件方法</el-button>
  </el-card>
  <br/>
  <el-card >
    <template #header>v-for 中的模板引用</template>

    <el-tag type="danger" size="large" style="font-size: .8em;font-weight: bold;">需要v3.5 及以上版本</el-tag>
    <ul>
      <li v-for="item in list" ref="itemRefs">
        {{ item }}
      </li>
    </ul>
    <el-button type="primary" @click="callItemRefs">显示引用</el-button>
  </el-card>
  <br/>
</template>

<script setup>
import { ref, computed, onMounted } from 'vue';
import ChildComponent from '@/components/ChildComponent.vue'
import { ElMessage } from 'element-plus';
import { fakerZH_CN as faker } from '@faker-js/faker'

onMounted(() => {

});

const myInput = ref(null)

const focusInput = () => {
   myInput.value.focus()  // 直接操作 DOM
}

const childRef = ref(null)

const callChildSayHollow = () => {
   ElMessage.primary(childRef.value.sayHello())
}

const list = ref(Array.from({ length: Math.floor(Math.random() * 10) + 1 }, () => ({
  item: faker.word.words({ count: Math.floor(Math.random() * 10) + 1 })
})))
const itemRefs = ref([])

const callItemRefs = () => {
  console.log(itemRefs.value)
  itemRefs.value.forEach((item, index) => {
      ElMessage({
        message: item.innerHTML,
        type: 'primary'
      })
  })
}

</script>

<style scoped>

</style>
组件
Vue 组件本质上是一个带有模板(HTML)、逻辑(JavaScript)和样式(CSS)的封装体,帮助我们构建模块化、易维护的前端应用。
基本用法
定义组件的方式
- 将 Vue 组件定义在一个单独的 .vue 文件中,这被叫做单文件组件 (Single-File Component 简称 SFC):
SFCBasicComponent.vue:
vue<template> <el-button @click="count++">You clicked me {{ count }} times.</el-button> </template> <script setup> import { ref } from 'vue' const count = ref(0) </script> <style scoped> </style>- 以一个包含 Vue 特定选项的 JavaScript 对象来定义
JsComponent.js
javascriptimport { ref } from 'vue' export default { setup() { const count = ref(0) return { count } }, template: ` <el-button @click="count++"> You clicked me {{ count }} times. <el-/button>` // 也可以针对一个 DOM 内联模板: // template: '#my-template-element' }注意
使用 template 选项进行组件定义(如动态注册组件或不使用单文件 .vue 模板时),需要使用完整版(带编译器)**的 Vue。
需要编辑 vite.config.js:
javascriptalias: { vue: 'vue/dist/vue.esm-bundler.js' //添加 }注册组件的方式
- 局部注册:组合式 API导入后直接使用;选项式 API 使用 components 选项来显式注册
- 全局注册:使用 Vue 应用实例的 .component() 方法,让组件在当前 Vue 应用中全局可用
vue<template> <el-card > <template #header>SFC单组件</template> <SFCBasicComponent></SFCBasicComponent> <SFCBasicComponent></SFCBasicComponent> <SFCBasicComponent></SFCBasicComponent> </el-card> <br/> <el-card > <template #header>Js对象定义组件</template> <el-tag type="warning" size="large" style="font-size: .8em;font-weight: bold;">需要在 vite.config.js 添加 alias- vue: 'vue/dist/vue.esm-bundler.js' </el-tag> <br/> <JsComponent></JsComponent> <JsComponent></JsComponent> <JsComponent></JsComponent> </el-card> <br/> <el-card > <template #header>全局注册组件</template> <ScGlobalComponent></ScGlobalComponent> </el-card> </template> <script setup> import { ref, computed, onMounted } from 'vue'; import SFCBasicComponent from '@/components/SFCBasicComponent.vue' import JsComponent from '@/components/JsComponent.js' const props = defineProps(); const emits = defineEmits(); onMounted(() => { }); </script> <style scoped> </style>
生命周期
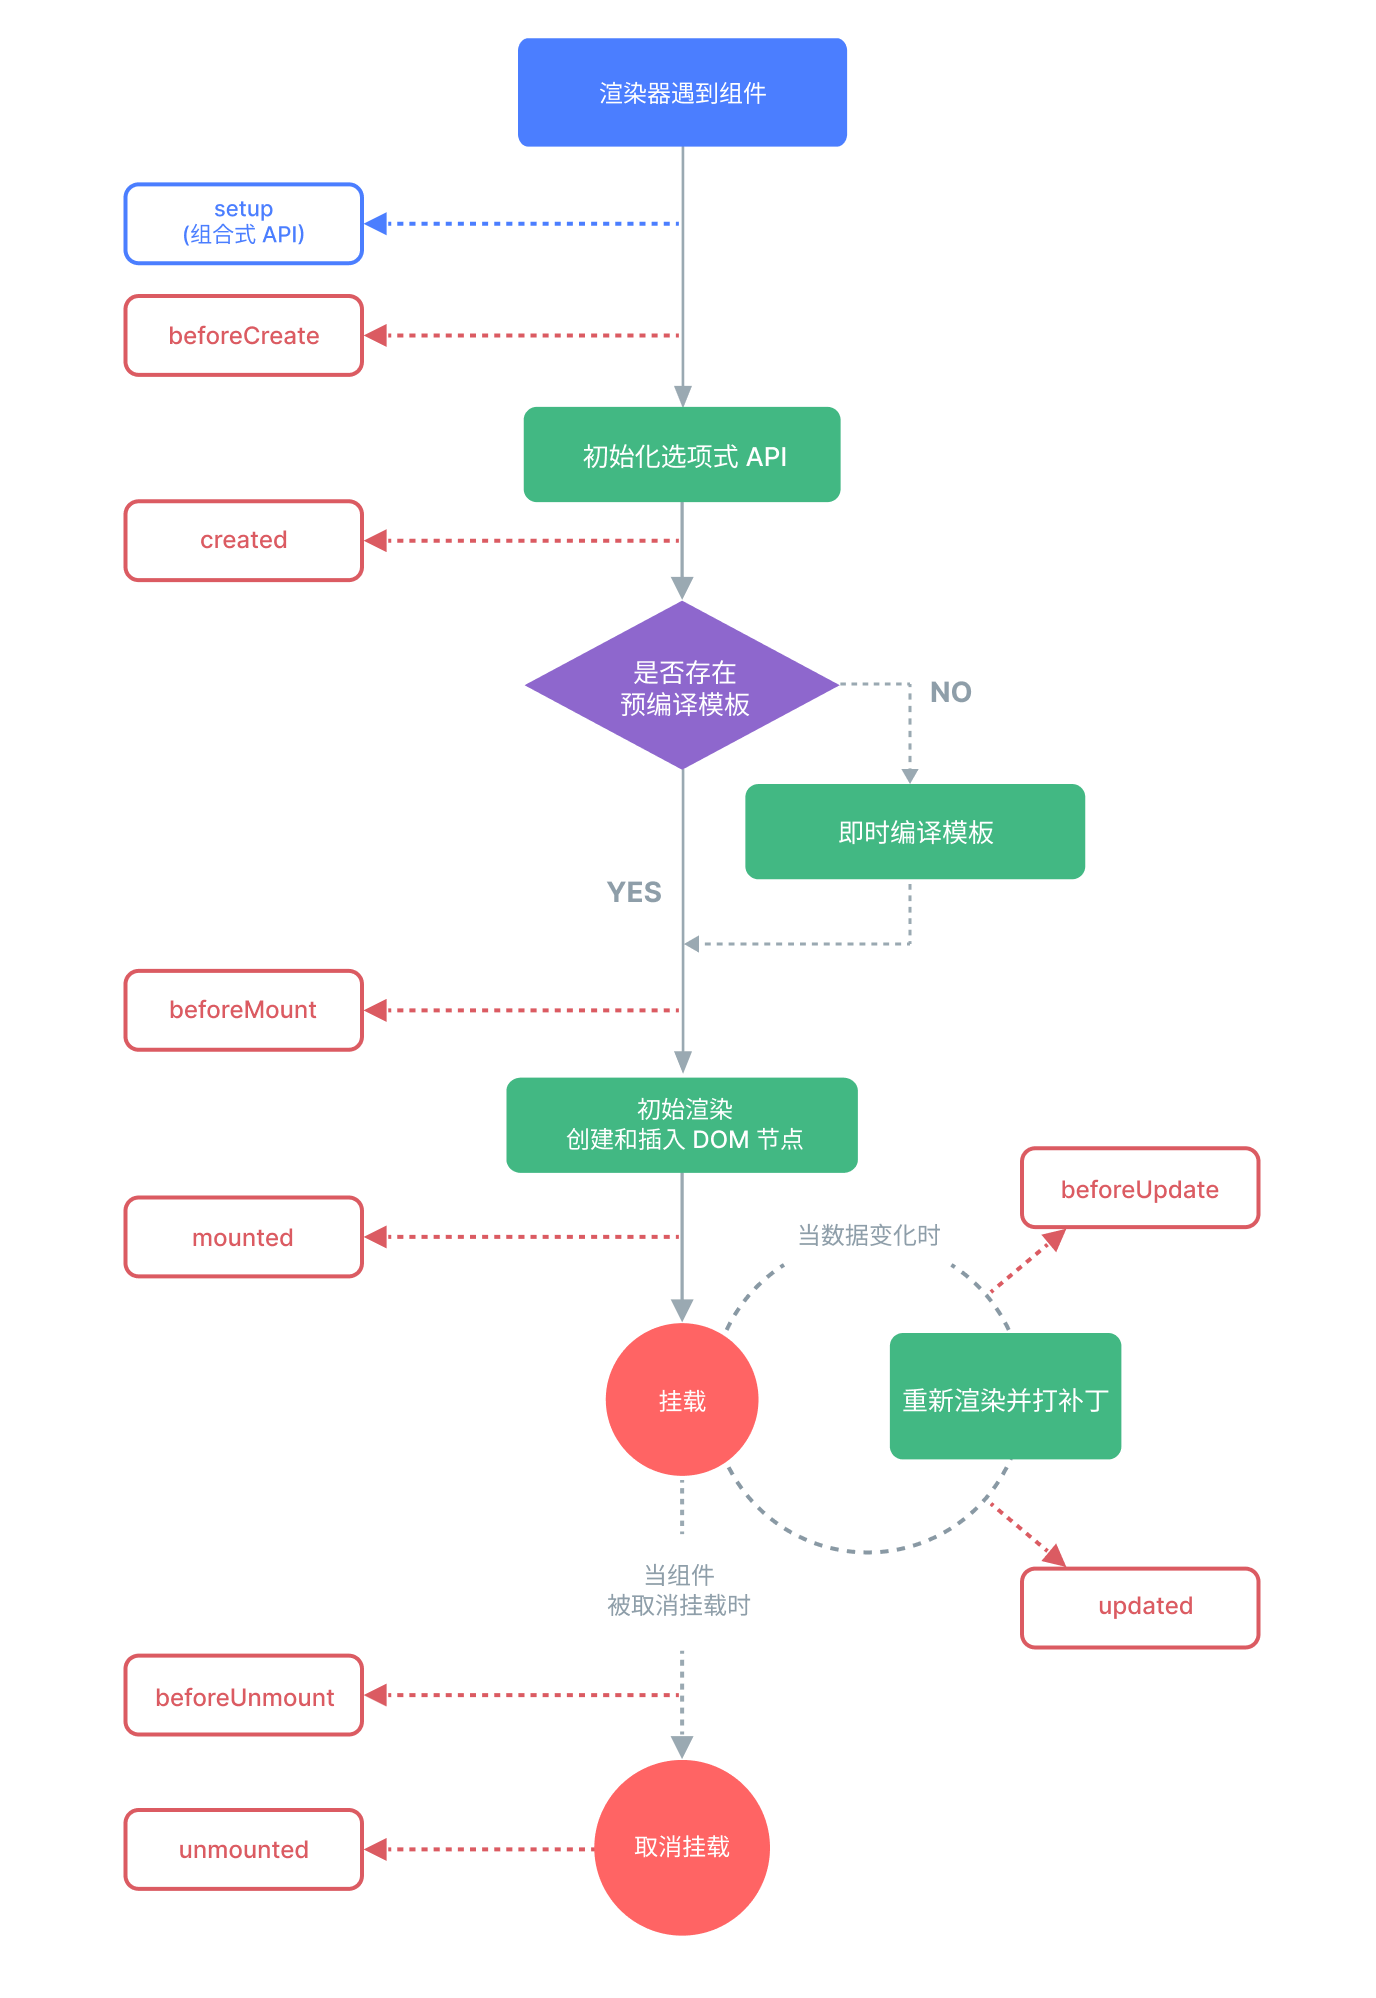
示例参考【基本用法】
属性
属性(props)是父组件传递给子组件的数据接口,子组件通过 props 接收这些数据,并可以在模板或逻辑中使用。
组件属性特点
- 属性是父组件传数据给子组件的唯一方式
- 校验方式:类型强校验 + 默认值 + 自定义验证
- 只读、单向绑定,子组件不应修改 props
- Boolean 类型转换:
booleanProp相当于:booleanProp = 'true'
- 组件属性示例
PropsDemoComponent.vue
<template>
  <p>String: </p>
  <p>{{ stringProp }}</p>
  <el-divider></el-divider>
  <p>Number </p>
  <p>{{ numberProp }}</p>
  <el-divider></el-divider>
  <p>Boolean </p>
  <p>{{ booleanProp }}</p>
  <el-divider></el-divider>
  <p>Array </p>
  <p>{{ arrayProp }}</p>
  <el-divider></el-divider>
  <p>Object </p>
  <p>{{ objectProp }}</p>
</template>

<script setup>
import { ElMessage } from 'element-plus';
import { watchEffect } from 'vue';

const props = defineProps({
  stringProp: String,
  numberProp: Number,
  booleanProp: Boolean,
  arrayProp: Array,
  objectProp: Object
})

watchEffect(() => {
  // 在 3.5 之前只运行一次
  // 在 3.5+ 中在 "foo" prop 变化时重新执行
  ElMessage.warning(props.stringProp)
})

function updateProps() {
  //单向数据流 会报错
  props.stringProp = "child updated"
}

defineExpose({ updateProps })

</script>

<style scoped></style>
Prop 校验
- 所有 prop 默认都是可选的,除非声明了 required: true。
- 除 Boolean 外的未传递的可选 prop 将会有一个默认值 undefined。
- 如果声明了 default 值,那么在 prop 的值被解析为 undefined 时,无论 prop 是未被传递还是显式指明的 undefined,都会改为 default 值。
- 当 prop 的校验失败后,Vue 会抛出一个控制台警告 (在开发模式下)。
- 组件属性校验示例
PropsValidatorComponent.vue
<template>
  <p>propA </p>
  <p>{{ propA }}</p>
  <el-divider></el-divider>
  <p>propB </p>
  <p>{{ propB }}</p>
  <el-divider></el-divider>
  <p>propC </p>
  <p>{{ propC }}</p>
  <el-divider></el-divider>
  <p>propD </p>
  <p>{{ propD }}</p>
  <el-divider></el-divider>
  <p>propE </p>
  <p>{{ propE }}</p>
  <el-divider></el-divider>
  <p>propF </p>
  <p>{{ propF }}</p>
  <el-divider></el-divider>
  <p>propG </p>
  <p>{{ propG }}</p>
  <el-divider></el-divider>
  <p>propH </p>
  <p>{{ propH }}</p>
</template>

<script setup>

const props = defineProps({
  // 基础类型检查
  // (给出 `null` 和 `undefined` 值则会跳过任何类型检查)
  propA: Number,
  // 多种可能的类型
  propB: [String, Number],
  // 必传,且为 String 类型
  propC: {
    type: String,
    required: true
  },
  // 必传但可为 null 的字符串
  propD: {
    type: [String, null],
    required: true
  },
  // Number 类型的默认值
  propE: {
    type: Number,
    default: 100
  },
  // 对象类型的默认值
  propF: {
    type: Object,
    // 对象或数组的默认值
    // 必须从一个工厂函数返回。
    // 该函数接收组件所接收到的原始 prop 作为参数。
    default(rawProps) {
      return { message: 'hello' }
    }
  },
  // 自定义类型校验函数
  // 在 3.4+ 中完整的 props 作为第二个参数传入
  propG: {
    validator(value, props) {
      // The value must match one of these strings
      return ['success', 'warning', 'danger'].includes(value)
    }
  },
  // 函数类型的默认值
  propH: {
    type: Function,
    // 不像对象或数组的默认,这不是一个
    // 工厂函数。这会是一个用来作为默认值的函数
    default() {
      return 'Default function'
    }
  }
})

</script>

<style scoped></style>
Attributes 透传
Attributes 透传(Fallthrough Attributes) 是指未在组件 props 或 emits 中声明的属性(如 class、style、原生 DOM 事件等),会自动“穿透”到组件根节点。
单层透传
- 多根节点,或者外层包裹
div时,需要使用v-bind="$attrs"指定透传目标元素。未声明的属性透传至根元素。 class、style会合并- 原生事件监听器也会透传
- 可以使用
defineOptions({ inheritAttrs: false })阻止透传
示例:
AttributeDemoComponent.vue
<!-- MyInput.vue -->
<template>
  <div class="field">
    <el-button type="primary" class="inner-input" v-bind="$attrs" @click="onClick">{{ label }}</el-button>
  </div>
</template>

<script setup>
// defineOptions({ inheritAttrs: false })
defineProps(['label'])
import { ElMessage } from 'element-plus'
import { useAttrs } from 'vue'

const attrs = useAttrs()


const onClick = () => {
  ElMessage.info({
    duration: 30000,
    showClose: true,
    message: `子组件触发`
  })
  for (let key in attrs) {
    ElMessage.warning({
      duration: 30000,
      showClose: true,
      message: `属性:${key}  ${attrs[key]} 已透传`
    })
  }
}
</script>

<style>
.field {
  padding: 4px;
}

.inner-input {
  width: 100%;
}
</style>
嵌套透传
- 声明过的 props 和侦听函数不再透传,其他全部透传
示例:
AttributeNestedDemoComponent.vue
<!-- MyInput.vue -->
<template>
  <AttributeDemoComponent @click="onClick" />
</template>

<script setup>
import AttributeDemoComponent from './AttributeDemoComponent.vue';
import { ElMessage } from 'element-plus'
import { useAttrs, defineProps } from 'vue'
const props = defineProps({
  nestedAttr: String,
});
const attrs = useAttrs()
const onClick = () => {
  ElMessage.primary({
    duration: 30000,
    showClose: true,
    message: `中间组件组件触发, nestedAttr:${props.nestedAttr}已消费`
  })
  for (let key in attrs) {
    ElMessage.error({
      duration: 30000,
      showClose: true,
      message: `属性:${key}  ${attrs[key]} 已透传`
    })
  }
}
</script>

<style scoped></style>- 调用示例:
<template>
  <el-card>
    <template #header>Attribute 透传</template>

    <el-tag type="warning" size="large" style="font-size: .8em;font-weight: bold;">多根节点,或者外层包裹div时,需要使用 v-bind="$attrs"
      指定透传目标元素。未声明的属性透传至根元素。 </el-tag>
    <br />
    <el-tag type="warning" size="large" style="font-size: .8em;font-weight: bold;">class、style 会合并 </el-tag>
    <br />
    <el-tag type="warning" size="large" style="font-size: .8em;font-weight: bold;">原生事件监听器也会透传 </el-tag>
    <br />
    <el-tag type="warning" size="large" style="font-size: .8em;font-weight: bold;">可以使用 defineOptions({ inheritAttrs:
      false })
      阻止透传</el-tag>
    <br />
    <AttributeDemoComponent id="sc-button" class="custom-input" @click="onClick" label="点我" nestedAttr='嵌套属性' />
  </el-card>
  <br />
  <el-card>
    <template #header>深层组件继承</template>

    <el-tag type="warning" size="large" style="font-size: .8em;font-weight: bold;">声明过的 props 和侦听函数不再透传,其他可以透传 </el-tag>
    <br />
    <AttributeNestedDemoComponent id="sc-button" class="custom-input" @click="onClick" label="点我" nestedAttr='嵌套属性' />
  </el-card>
</template>

<script setup>
import AttributeDemoComponent from '@/components/AttributeDemoComponent.vue';
import AttributeNestedDemoComponent from '@/components/AttributeNestedDemoComponent.vue';
import { ElMessage } from 'element-plus'


const onClick = () => {
  ElMessage.info({ duration: 30000, showClose: true, message: `父组件触发` })
}

</script>

<style scoped></style>
事件
Vue 组件之间的事件主要是指:子组件向父组件发送事件通知,父组件监听这个事件并做出响应。
emit
- 在子组件使用
$emit('eventName', data)实现子组件向父组件发送事件通知 - 也可以在子组件使用
defineEmits实现 defineEmits可以实现数据校验,但校验结果不影响事件传递- 除此之外,可以使用
defineExpose暴露子组件方法供父组件调用
示例:
子组件:
<template>
  <el-button @click="$emit('greet1', '子组件: greet1')">Greet</el-button>

  <el-button type="primary" @click="submit">submit</el-button>
</template>

<script setup>
import { ElMessage } from 'element-plus';
import { ref, computed, onMounted } from 'vue';

const props = defineProps();
const emits = defineEmits({
  greet2: null,

  // 没有校验
  submit: null,

  // 校验 submit 事件
  submitwithValidator: ({ email, password }) => {
    if (email && password) {
      return true
    } else {
      ElMessage.error('Invalid submit event payload!')
      return false
    }
  }
})

const submit = () => {
  emits('submit', { email: "aa@qq.com" })
  //返回值并不会中断事件传递
  if (!emits('submitwithValidator', { email: null, password: null })) {
    ElMessage.error('事件校验失败依然传递')
  }
}
onMounted(() => {
  //代码执行时也可以使用emits传递

  let count = 0;
  const timer = setInterval(() => {
    count++
    emits('greet2', '子组件: greet2', count, 100)
    if (count === 100) {
      clearInterval(timer); // 停止定时器
    }
  }, 1000)
});


function greet3() {
  return `hello from child`
}

defineExpose({ greet3 })

</script>

<style scoped></style>
父组件:
<template>
  <el-card>
    <template #header>事件处理</template>

    <p>事件处理参考:</p>
    <el-link href="/Essentials/EventHandling" type="primary">基础>事件处理</el-link>
  </el-card>
  <br />
  <el-card>
    <template #header>组件事件(emit,实现 子 => 父)</template>
    <el-tag type="warning" size="large" style="font-size: .8em;font-weight: bold;">可以在子组件使用 $emit('eventName', data)
      实现</el-tag>
    <br />
    <el-tag type="warning" size="large" style="font-size: .8em;font-weight: bold;">也可以在子组件使用 defineEmits 实现</el-tag>
    <br />
    <el-tag type="warning" size="large" style="font-size: .8em;font-weight: bold;">defineEmits
      可以实现数据校验,但校验结果不影响事件传递</el-tag>
    <br />
    <el-tag type="warning" size="large" style="font-size: .8em;font-weight: bold;">除此之外,可以使用 defineExpose
      暴露子组件方法供父组件调用</el-tag>
    <br />
    <EventDemoComponent @greet1="handeGreet" @greet2="handeGreet" @submit="submit" @submitwithValidator="submit"
      ref="eventDemoRef" />
  </el-card>
</template>

<script setup>
import { ref, computed, onMounted } from 'vue';
import EventDemoComponent from '@/components/EventDemoComponent.vue';
import { ElMessage } from 'element-plus';

const props = defineProps();

const emits = defineEmits();

onMounted(() => {
  ElMessage.info({
    showClose: true,
    duration: 5000,
    message: eventDemoRef.value.greet3()
  })
});

const handeGreet = (data, count, sum) => {
  ElMessage.success({
    showClose: true,
    duration: 5000,
    message: data + ` 第${count} / ${sum}次`
  })
}

const submit = (data) => {
  ElMessage.warning({
    showClose: true,
    duration: 5000,
    message: `submited: ${data.email}, ${data.password}`
  })
}

const eventDemoRef = ref()

</script>

<style scoped></style>
mitt
可以使用mitt实现兄弟组件的通讯
示例:
- 安装mitt:
npm install mitt - 新建mitt 事件总线统一管理
eventBus.js
import mitt from 'mitt'
const emitter = mitt()
export default emitter- 新建子组件
子组件A: MittChildAComponent.vue
<template>
  <div>这是组件A</div>
  <el-button typr="primary" @click="handleClick">传递事件</el-button>
</template>

<script setup>
import { ref, computed, onMounted } from 'vue';
import emitter from '@/mitt/eventBus'
import { fakerZH_CN as faker } from '@faker-js/faker'


const props = defineProps();

const emits = defineEmits();

const handleClick = () => {
  emitter.emit('MCB', '来自A的数据: ' + faker.person.fullName(),)
}

onMounted(() => {

});

</script>

<style scoped></style>
子组件B: MittChildBComponent.vue
<template>
  <div>这是组件B</div>
  <p>{{ dataB }}</p>
</template>

<script setup>
import { ref, computed, onMounted, onUnmounted } from 'vue';
import emitter from '@/mitt/eventBus'
import { ElMessage } from 'element-plus';

const dataB = ref();

onMounted(() => {
  emitter.on("*", (data) => {
    console.log(data)
  })

  emitter.on("MCB", (data) => {
    ElMessage.info(data)
    dataB.value = data
  })
});

onUnmounted(() => {
  emitter.off("MCB")
  //取消注册所有事件
  emitter.all.clear()
});

</script>

<style scoped></style>- 父组件调用
<template>
  <el-card>
    <template #header>事件总线(mitt,实现 兄弟 => 兄弟)</template>

    <MittChildAComponent />
    <MittChildBComponent />
  </el-card>
</template>

<script setup>

import MittChildAComponent from '@/components/MittChildAComponent.vue';
import MittChildBComponent from '@/components/MittChildBComponent.vue';


</script>

<style scoped></style>
插槽
**插槽(Slot)**是一种让父组件向子组件传递任意内容(包括 HTML、组件等)的机制。
Vue 提供了三种类型的插槽:
- 默认插槽(default slot)
- 默认插槽中父组件所有未被具名插槽包裹的内容
- 内容可以是文本,也可以是任何其他东西。如果没有就是默认值
示例:
子组件:DefaultSlotComponent.vue
<template>
  <div class="card">
    <!-- 默认插槽 -->
    <slot>默认值</slot>
  </div>
</template>

<script setup>

</script>

<style scoped>
.card {
  border: 1px solid #ccc;
  padding: 16px;
}
</style>
父组件:
<template>
  <el-card>
    <template #header>默认插槽(default slot)</template>
    <el-tag type="warning" size="large" style="font-size: .8em;font-weight: bold;">默认插槽中父组件所有未被具名插槽包裹的内容</el-tag>
    <br />
    <el-tag type="warning" size="large" style="font-size: .8em;font-weight: bold;">内容可以是文本,也可以是任何其他东西。如果没有就是默认值</el-tag>
    <br />
    <!-- 默认值 -->
    <DefaultSlotComponent></DefaultSlotComponent>
    <!-- 文本 -->
    <DefaultSlotComponent>可以是文本</DefaultSlotComponent>
    <!-- 元素 -->
    <DefaultSlotComponent>
      <div style="background-color: lightblue;">还可以是元素</div>
    </DefaultSlotComponent>
  </el-card>
</template>

<script setup>
import DefaultSlotComponent from '@/components/DefaultSlotComponent.vue';
</script>

<style scoped></style>- 具名插槽(named slot)
用于在子组件中定义多个插槽。
示例:
子组件:NamedSlotComponent.vue
<template>
  <div class="header">
    <slot name="header"></slot>
  </div>
  <div v-if="$slots.default" class="content">
    <slot></slot>
  </div>
  <div v-if="$slots.footer" class="footer">
    <slot name="footer"></slot>
  </div>
  <div v-if="$slots.dynamicSlotName1" style="background-color: lightcoral; padding: 5px; min-height: 50px;">
    <slot name="dynamicSlotName1">
      <p>动态插槽1</p>
    </slot>
  </div>
  <div v-if="$slots.dynamicSlotName2" style="background-color: lightgreen; padding: 5px; min-height: 50px;">
    <slot name="dynamicSlotName2">
      <p>动态插槽2</p>
    </slot>
  </div>
</template>

<script setup>
import { ref, computed, onMounted } from 'vue';

const props = defineProps();

const emits = defineEmits();

onMounted(() => {

});

</script>

<style scoped>
.header {
  padding: 5px;
  background-color: cornflowerblue;
  min-height: 50px;
}

.content {
  padding: 5px;
  min-height: 50px;
}

.footer {
  padding: 5px;
  background-color: lightgray;
  min-height: 50px;
}
</style>
父组件
<template>
  <el-card>
    <template #header>具名插槽(named slot)</template>
    <el-tag type="warning" size="large"
      style="font-size: .8em;font-weight: bold;">与header不同的是,条件渲染的插槽(default,footer)如果不写则不渲染。header即使不传div也会渲染</el-tag>
    <br />
    <el-button type="primary" style="margin-bottom: 10px;"
      @click="headerSlotFlag ? headerSlotFlag = false : headerSlotFlag = true"> 切换header插槽渲染状态</el-button>
    <el-button type="primary" style="margin-bottom: 10px;"
      @click="defultSlotFlag ? defultSlotFlag = false : defultSlotFlag = true"> 切换defalut插槽渲染状态</el-button>
    <el-button type="primary" style="margin-bottom: 10px;"
      @click="footerSlotFlag ? footerSlotFlag = false : footerSlotFlag = true"> 切换fotter插槽渲染状态</el-button>
    <el-button type="warning" style="margin-bottom: 10px;"
      @click="dynamicSlotName == 'dynamicSlotName1' ? dynamicSlotName = 'dynamicSlotName2' : dynamicSlotName = 'dynamicSlotName1'">
      切换动态插槽</el-button>
    <NamedSlotComponent>
      <template v-if="headerSlotFlag" #header>
        <p>这是 header</p>
      </template>
      <template v-if="defultSlotFlag">
        <p>这是内容</p>
      </template>
      <template v-if="footerSlotFlag" #footer>
        <p>这是 footer</p>
      </template>
      <template #[dynamicSlotName]>

      </template>
    </NamedSlotComponent>
  </el-card>
</template>

<script setup>
import { ref, computed, onMounted } from 'vue';
import NamedSlotComponent from '@/components/NamedSlotComponent.vue';

const dynamicSlotName = ref('dynamicSlotName1')
const headerSlotFlag = ref(true)
const defultSlotFlag = ref(true)
const footerSlotFlag = ref(true)


</script>

<style scoped></style>- 作用域插槽(scoped slot)
作用域插槽允许子组件将数据传递给插槽内容,由父组件决定如何使用这些数据进行渲染。
子组件:ScopedSlotComponent.vue
<template>
  <div class="namedSlotProps">
    <p>命名作用域插槽:</p>
    <slot name="namedSlotProps" :message="message"></slot>
  </div>
  <div>
    <p>列表渲染:</p>
    <ul style="margin: 0;padding: 0;">
      <li v-for="item in items" style="list-style-type: none; margin: 0;">
        <slot name="item" v-bind="item"></slot>
      </li>
    </ul>
  </div>
</template>

<script setup>
import { ref, computed, onMounted } from 'vue';
import { fakerZH_CN as faker } from '@faker-js/faker'


const message = ref("hello")

const updateMessage = () => {
  message.value = faker.word.noun()
}

const items = ref([])

const updateItems = () => {
  items.value.length = 0;
  for (let index = 0; index < 10; index++) {
    items.value.push(faker.airline.airline())
  }
}

onMounted(() => {
  setInterval(() => {
    updateMessage()
    updateItems()
  }, 1000);
});

</script>

<style scoped></style>
父组件
<template>
  <el-card>
    <template #header>作用域插槽(scoped slot)</template>
    <el-tag type="warning" size="large"
      style="font-size: .8em;font-weight: bold;">子组件将数据传递给插槽内容,由父组件决定如何使用这些数据进行渲染。</el-tag>
    <br />
    <ScopedSlotComponent>
      <template #namedSlotProps="{ message }">
        <div style="background-color: aquamarine; min-height: 50px;">
          <p style="line-height: 50px;">{{ message }}</p>
        </div>
        <el-divider />
      </template>

      <template #item="{ name, iataCode }">
        <div class="item" style="background-color: lightblue; min-height: 30px;">
          <p>{{ name }} | {{ iataCode }}</p>
        </div>
      </template>
    </ScopedSlotComponent>
  </el-card>
</template>

<script setup>
import ScopedSlotComponent from '@/components/ScopedSlotComponent.vue';

</script>

<style scoped></style>
依赖注入
Vue 的依赖注入(Dependency Injection)是一种在组件树中“跨层级传值”的机制。
- 依赖注入包括两个 API:
provide(): 在祖先组件中“提供”数据。inject(): 在后代组件中“注入”数据。
- 应用场景
- 解决 Prop 逐级透传问题
- 跨多层组件传递全局配置
- 表单组件共享校验上下文
- 插件开发中注入服务对象(如 i18n、store)
特性
- 支持响应式数据注入
- 建议使用 Symbol避免 key 冲突(如果有多个父组件提供了相同键的数据,注入将解析为组件链上最近的父组件所注入的值。)
- 插槽中的子组件 并不会继承当前组件的 provide,它仍然使用其父组件的 provide。
- 只能注入祖先组件中 provide 的内容,不能注入兄弟或后代
示例:
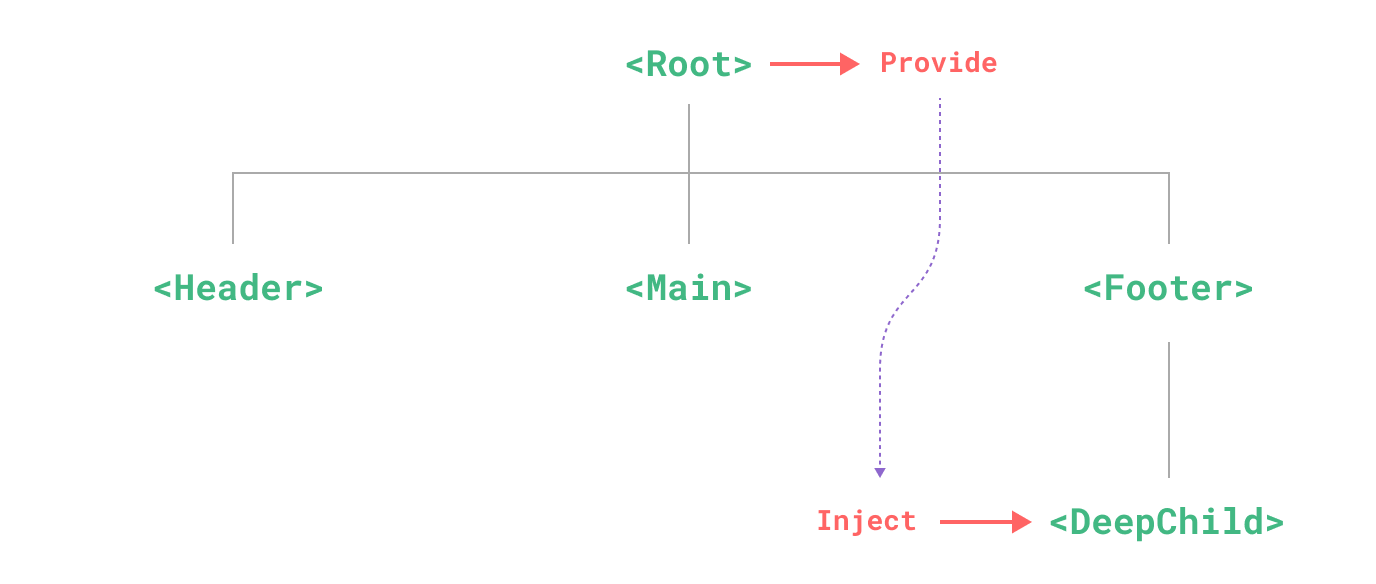
组件结构:
├── ProvideAndInject.vue  ← 提供者(祖先)
│   └── ProvideAndInjectComponentA.vue     ← 子组件A,修改数据
│   └── ProvideAndInjectComponentB.vue     ← 子组件B,读取数据
ProvideAndInjectComponentA
<template>
  <div>
    <h3>子组件 A</h3>
    <el-button @click="switchTheme">切换主题</el-button>
  </div>
</template>

<script setup>
import { inject } from 'vue'

const ThemeKey = Symbol.for('theme')
const theme = inject(ThemeKey)

function switchTheme() {
  if (!theme)
    throw new Error('未找到主题提供者')
  theme.value = theme.value === 'light' ? 'dark' : 'light'
}
</script>
ProvideAndInjectComponentB
<!-- ChildB.vue -->
<template>
  <div>
    <h3>子组件 B</h3>
    <p>当前读取的主题:{{ theme }}</p>
  </div>
</template>

<script setup>
import { inject } from 'vue'

const ThemeKey = Symbol.for('theme')
const theme = inject(ThemeKey, 'default') // 提供默认值
</script>
ProvideAndInject
<template>
  <el-card>
    <template #header>
      祖先组件(ProvideParent)
    </template>
    <p>当前主题:{{ theme }}</p>
  </el-card>
  <br />
  <el-card>
    <ProvideAndInjectComponentA />
  </el-card>
  <br />
  <el-card>
    <ProvideAndInjectComponentB />
  </el-card>
</template>

<script setup>
import { ref, provide } from 'vue'

import ProvideAndInjectComponentA from '@/components/ProvideAndInjectComponentA.vue'
import ProvideAndInjectComponentB from '@/components/ProvideAndInjectComponentB.vue'

const ThemeKey = Symbol.for('theme')
const theme = ref('light') // 响应式数据
provide(ThemeKey, theme)
</script>
异步组件
异步组件(Async Components)是一种按需加载组件的机制,可以在需要时才加载组件,而不是在初始加载时就加载所有组件。
这样做的好处是减小打包体积,提高页面加载性能,尤其适用于大型项目或路由懒加载场景。
使用方式
const AsyncComponent = defineAsyncComponent(() =>
  import('./MyComponent.vue')
)
或者完整写法
const AsyncComponent = defineAsyncComponent({
  loader: () => import('./MyComponent.vue'),
  loadingComponent: LoadingSpinner,
  errorComponent: LoadFailed,
  delay: 200,       // 等待超过 200ms 再显示 loading 组件
  timeout: 3000     // 加载超过 3 秒视为失败
})
注意事项
- 异步组件是懒加载的,首次使用时会延迟;
- 如果依赖较多,建议配合 loadingComponent 提供良好用户体验;
- 异步组件在 SSR(服务器端渲染)中处理方式不同,需注意兼容性;
- 支持 defineAsyncComponent 是从 Vue 3 开始的,Vue 2 中使用的是工厂函数 () => import()。
逻辑复用
自定义指令
除了 Vue 内置的一系列指令 (比如 v-model 或 v-show) 之外,Vue 还允许你注册自定义的指令 (Custom Directives)。
注册方式
- 局部注册
在
<script setup>中,任何以 v 开头的驼峰式命名的变量都可以当作自定义指令使用js<script setup> // 在模板中启用 v-highlight const vHighlight = { mounted: (el) => { el.classList.add('is-highlight') } } </script> <template> <p v-highlight>This sentence is important!</p> </template>在不使用
<script setup>的情况下,自定义指令需要通过 directives 选项注册jsexport default { setup() { /*...*/ }, directives: { // 在模板中启用 v-highlight highlight: { /* ... */ } } }- 全局注册
jsapp.directive('color', (el, binding) => { // 这会在 `mounted` 和 `updated` 时都调用 el.style.color = binding.value })参数说明
jsdirective(el, binding, vnode, prevVnode)其中 binding 对象的属性:
value: 传给指令的值,如 v-log="123" 中为 123oldValue: 先前的值(仅在 updated 和 beforeUpdate 钩子中可用)arg: 传给指令的参数,如 v-log:click="123" 中为 clickmodifiers: 修饰符对象,如 v-log.stop 中为
生命周期
| 钩子名 | 触发时机 |
|---|---|
created | 绑定指令时(元素未挂载) |
beforeMount | 元素插入父节点之前 |
mounted | 元素已插入父节点 |
beforeUpdate | 组件更新前 |
updated | 组件更新后 |
beforeUnmount | 卸载前 |
unmounted | 卸载后 |
- 使用示例
示例:
<template>
  <el-card>
    <template #header>
      局部注册指令(获取焦点)
    </template>
    <el-tag type="warning" size="large" style="font-size: .8em;font-weight: bold;">更新绑定元素时触发指令updated</el-tag>
    <br />
    <el-button type="primary" @click="changeInputWidth">
      修改输入框长度,{{ inputWidth }}
    </el-button>
    <br />
    <!-- 不推荐在组件上使用自定义指令。当组件具有多个根节点时可能会出现预期外的行为。 -->
    <input id="input" v-focus :style="{ width: inputWidth, 'margin-top': '10px' }" />
  </el-card>
  <br />

  <el-card>
    <template #header>
      全局注册指令(拖拽)
    </template>

    <el-button type="primary" @click="changeDragScope">
      切换为拖动参数为:{{ dragArg === 'parent' ? '视口' : '父容器' }}
    </el-button>
    <div :style="{ position: dargParentStyle, height: '200px', margin: '5px 0', border: 'solid 1px' }">
      <!-- 这里需要再元素update时加载,因为需要使用按钮更新行为 -->
      <div v-drag:[dragArg]
        :style="{ height: '70px', width: '70px', 'background-color': 'darkgoldenrod', 'left': dragDemoLeft, 'top': dragDemoTop }">
      </div>
    </div>
  </el-card>

</template>

<script setup>
import { ElMessage } from 'element-plus';
import { ref, computed, onMounted } from 'vue';

const dragArg = ref('')

const dargParentStyle = computed(() => {
  return dragArg.value === 'parent' ? 'relative' : 'static'
})

const changeDragScope = () => {
  dragArg.value = dragArg.value === 'parent' ? '' : 'parent'
}

const dragDemoLeft = ref("0px")
const dragDemoTop = ref("0px")

const inputWidth = ref("100px")

const changeInputWidth = () => {
  inputWidth.value = `${Math.floor(Math.random() * 1000) + 100}px`
}

const vFocus = {
  created(el, binding) {
    ElMessage.info('v-focus binding element created')
  },
  beforeMount(el, binding) {
    ElMessage.info('v-focus binding element beforeMount')
  },
  mounted: (el) => {
    el.focus()
    ElMessage.info('v-focus binding element mounted')
  },
  beforeUpdate(el, binding) {
    ElMessage.info('v-focus binding element beforeUpdate')
  },
  updated(el, binding) {
    ElMessage.info('v-focus binding element updated')
  },
  beforeUnmount(el, binding) {
    ElMessage.info('v-focus binding element beforeUnmount')
  },
  unmounted(el, binding) {
    ElMessage.info('v-focus binding element unmounted')
  }
}

onMounted(() => {
  dragArg.value = 'parent'
  // changeInputWidth()
})

</script>

<style scoped></style>
main.js
createApp(App)
  .directive('drag', {
    created(el, binding) {
      console.log('created', el)
    },
    beforeMount(el, binding) {
      console.log('beforeMount', el)
    },
    mounted(el, binding) {
      console.log('mounted', el)
    },
    beforeUpdate(el, binding) {
      console.log('beforeUpdate', el)
    },
    updated(el, binding) {
      console.log('updated', el)

      el.style.position = 'absolute'
      el.style.cursor = 'move'

      const limitToParent = binding.arg === 'parent'
      el.onmousedown = function (e) {
        const disX = e.clientX - el.offsetLeft
        const disY = e.clientY - el.offsetTop
        const parent = el.parentElement

        console.log("parent", parent)
        console.log("limitToParent", limitToParent)

        document.onmousemove = function (e) {
          let left = e.clientX - disX
          let top = e.clientY - disY

          if (limitToParent && parent) {
            const maxLeft = parent.clientWidth - el.offsetWidth
            const maxTop = parent.clientHeight - el.offsetHeight

            left = Math.max(0, Math.min(left, maxLeft))
            top = Math.max(0, Math.min(top, maxTop))
          }

          const maxLeft = window.innerWidth - el.offsetWidth
          const maxTop = window.innerHeight - el.offsetHeight

          left = Math.max(0, Math.min(left, maxLeft))
          top = Math.max(0, Math.min(top, maxTop))

          el.style.left = left + 'px'
          el.style.top = top + 'px'
        }
        document.onmouseup = function () {
          document.onmousemove = null
          document.onmouseup = null
        }
      }
    },
    beforeUnmount(el, binding) {
      console.log('beforeUnmount', el)
    },
    unmounted(el, binding) {
      console.log('unmounted', el)
    }
  })
插件
插件(Plugin) 是一种用于扩展 Vue 应用功能的机制。插件通常用于封装可复用的功能模块,比如:
常见用途:
- 添加全局方法或属性;
- 添加全局组件或指令;
- 注入第三方库;
- 实现自定义功能(如权限、日志等)。
使用
main.js
import ElementPlus from 'element-plus'
app.use(ElementPlus)- 常见插件 | 功能类型 | 示例 | | -------- | -------------------------------------- | | UI 框架 | Element Plus、Vuetify、Naive UI | | 状态管理 | Vuex(Vue 2)、Pinia(Vue 3) | | 路由管理 | Vue Router | | 数据请求 | Axios 插件封装、Vue Resource(已废弃) | | 国际化 | vue-i18n | | 图表库 | vue-echarts、vue-chartjs | | 日志收集 | 自定义日志插件(上报服务端) |
内置组件
Vue 提供了一些 内置组件(Built-in Components),这些组件不需要引入,可以直接在模板中使用。
| 组件名 | 用途 | Vue 版本 |
|---|---|---|
<component> | 动态组件切换 | 2 / 3 |
<transition> | 单元素过渡动画 | 2 / 3 |
<transition-group> | 列表动画 | 2 / 3 |
<keep-alive> | 缓存组件,提升性能 | 2 / 3 |
<teleport> | 将内容传送到其他 DOM 位置 | Vue 3 |
示例:
<template>
<el-card>
<template #header>
<component/> (动态组件)<br />
<KeepAlive/> (缓存状态)
</template>
<el-tag type="warning" size="large" style="font-size: .8em;font-weight: bold;">使用 shallowRef 来创建组件引用是为了避免
组件实例的深层响应式追踪
</el-tag>
<br />
<el-button type="primary" style="margin-bottom: 5px;"
@click="currentComponent = currentComponent === BuildInDemoComponentA ? BuildInDemoComponentB : BuildInDemoComponentA">切换组件</el-button>
<br />
<el-checkbox v-model="keepAlive">KeepAlive</el-checkbox>
<el-divider></el-divider>
<KeepAlive v-if="keepAlive">
<component :is="currentComponent" />
</KeepAlive>
<component v-else :is="currentComponent" />
</el-card>
<br />
<el-card>
<template #header>
<transition/> (动画)
</template>
<p>Transition</p>
<el-button @click="show = !show">切换显示状态</el-button>
<Transition>
<p v-if="show">hello</p>
</Transition>
<el-divider></el-divider>
<p>TransitionGroup</p>
<el-button @click="items.splice(2, 0, faker.word.noun())">添加</el-button>
<el-button @click="items.splice(4, 1)">删除</el-button>
<TransitionGroup name="list" tag="ul">
<li v-for="item in items" :key="item">
{{ item }}
</li>
</TransitionGroup>
</el-card>
<br />
<el-card>
<template #header>
<Teleport/> (将内容传送到 DOM 的其他位置)
</template>
<el-checkbox v-model="teleportToBody">传送到body</el-checkbox>
<div style="position: relative; height: 200px;">
<teleport v-if="teleportToBody" to="body">
<div v-drag:parent class="suspension">
<span style="line-height: 100px;">悬浮框</span>
</div>
</teleport>
<div v-else v-drag:parent class="suspension">
<span style="line-height: 100px;">悬浮框</span>
</div>
</div>
</el-card>
</template>
<script setup>
import { ref, shallowRef, computed, onMounted } from 'vue';
import { fakerZH_CN as faker } from '@faker-js/faker'
import BuildInDemoComponentA from '@/components/BuildInDemoComponentA.vue';
import BuildInDemoComponentB from '@/components/BuildInDemoComponentB.vue';
const currentComponent = shallowRef(BuildInDemoComponentA)
const keepAlive = ref(true)
const show = ref(true)
const teleportToBody = ref(false)
const items = ref([])
onMounted(() => {
for (let index = 0; index < 10; index++) {
items.value.push(faker.word.noun())
}
})
</script>
<style scoped>
/* 下面我们会解释这些 class 是做什么的 */
.v-enter-active,
.v-leave-active {
transition: opacity 0.5s ease;
}
.v-enter-from,
.v-leave-to {
opacity: 0;
}
.list-move,
/* 对移动中的元素应用的过渡 */
.list-enter-active,
.list-leave-active {
transition: all 0.5s ease;
}
.list-enter-from,
.list-leave-to {
opacity: 0;
transform: translateX(30px);
}
/* 确保将离开的元素从布局流中删除
以便能够正确地计算移动的动画。 */
.list-leave-active {
position: absolute;
}
.suspension {
position: absolute;
background-color: darkcyan;
width: 100px;
height: 100px;
top: 0;
bottom: 0;
left: 0;
right: 0;
/* margin: auto; */
text-align: center;
}
</style>应用规模化
vue-router
Vue Router 是 Vue.js 官方提供的路由管理器,是构建单页面应用(SPA)时用于处理页面导航的标准方式。它可以让你在不同组件之间导航,同时保持应用状态不丢失。
“路由”指的是根据 URL 的不同,展示不同的页面组件。例如:
/home        => HomePage.vue
/about       => AboutPage.vue
/products/1  => ProductDetail.vue
动态组件与路由
动态组件和路由可以实现的类似的功能
- 动态组件本质上是一个组件占位符,你可以动态切换其中显示的组件
- Vue Router 会根据 URL 路径 来渲染组件
| 特性 / 区别 | 动态组件 <component :is="..."> | Vue Router 路由系统 |
|---|---|---|
| 本质 | Vue 的组件系统功能 | Vue 官方的路由导航系统 |
| 控制方式 | 通过变量动态切换组件 | 根据 URL 控制当前页面组件 |
| URL 是否变化 | ❌ 不变,仍是同一个页面 URL | ✅ 会变化,例如 /home、/about |
| 浏览器前进后退支持 | ❌ 无(除非你手动处理) | ✅ 内建支持历史记录导航 |
| 适合场景 | 标签页切换、动态表单、多种视图快速切换等 | 页面导航、多页面 SPA 应用 |
| 懒加载支持 | ✅ 手动使用异步组件 | ✅ 内建支持路由懒加载 |
基本用法
- 安装
npm install vue-router@4- 创建路由器实例
建议独立模块统一管理路由:
新建文件夹 router, 新建文件 index.js
const router = createRouter({
  history: createWebHistory(),
  routes: []
})

router.addRoute({
  path: "/",
  name: "Index",
  component: () => import('@/views/Index.vue'),
  meta: { title: '主页' }
})

export default router- 注册路由器插件
main.js
import router from './router'

const app = createApp(App)
// 其他插件
app..use(router)- 使用RouterView渲染路由组件
在需要渲染路由组件的地方:
<template>
  <!-- 其他组件或元素 -->
  <!-- 切换路由后路由组件会被渲染在这 -->
  <RouterView />
</template>- 切换路由
非编程式导航(<router-link>)
<router-link to="/home">首页</router-link>提示
el-menu 等框架组件并不是通过非编程式导航实现的,但可以有类似的使用方式。
如 el-menu可以通过:
- router="true":开启路由模式,自动使用 this.$router.push(index)
- index="/about":写上要跳转的路径
- default-active="/home":指定默认选中的菜单项(建议设置成当前路由路径)
<el-menu :router="true" default-active="/home">
  <el-menu-item index="/home">首页</el-menu-item>
  <el-menu-item index="/about">关于</el-menu-item>
</el-menu>
el-menu 内部其实帮你做了类似:
this.$router.push(index)编程式导航
除了使用 <router-link> 创建 a 标签来定义导航链接,我们还可以借助 router 的实例方法,通过编写代码来实现。
// 字符串路径
router.push('/users/eduardo')

// 带有路径的对象
router.push({ path: '/users/eduardo' })

// 命名的路由,并加上参数,让路由建立 url
router.push({ name: 'user', params: { username: 'eduardo' } })

// 带查询参数,结果是 /register?plan=private
router.push({ path: '/register', query: { plan: 'private' } })

// 带 hash,结果是 /about#team
router.push({ path: '/about', hash: '#team' })router和route
router: 路由器实例。即由 createRouter() 返回的对象。在应用中,访问该对象的方式取决于上下文。例如,在组合式 API 中,它可以通过调用 useRouter() 来访问。在选项式 API 中,它可以通过 this.$router 来访问。
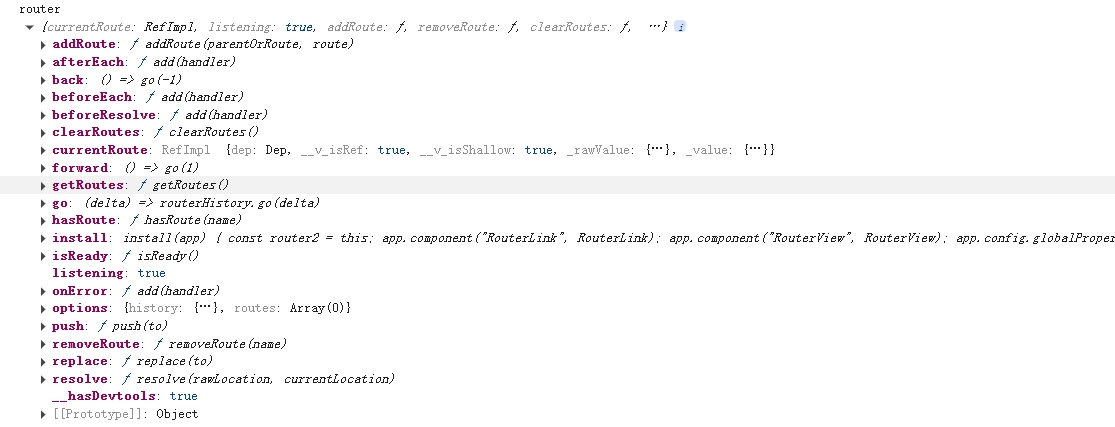
route: 当前路由。基于不同 API 风格的组件,它可以通过 useRoute() 或 this.$route 来访问。
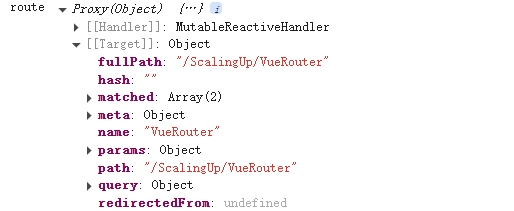
注意
易错点:vue3 中 <script setup> 是编译阶段处理的语法糖,它相当于直接把变量写在 setup() 函数体中。在模块严格模式下普通函数this绑定undefined。(非严格模式是window)
所以setup不能用this.$route,而template可以用(有实例)
路由传参
路由传参可以有以下几种方式
| 方式 | 是否出现在 URL | 是否支持刷新 | 典型用法 |
|---|---|---|---|
| params | ✅ 是 | ✅ 是 | 用户详情、编辑、ID导航 |
| query | ✅ 是 | ✅ 是 | 搜索过滤、分页 |
| props 映射 | ✅ 是(基于上面) | ✅ 是 | 解耦组件与路由 |
示例:
SubView1.vue
<template>
  <el-descriptions title="SubView1" style="padding: 10px;" border>
    <el-descriptions-item label="name">{{ $route.name }}</el-descriptions-item>
    <el-descriptions-item label="path">{{ $route.path }}</el-descriptions-item>
    <el-descriptions-item label="fullPath">{{ $route.fullPath }}</el-descriptions-item>
    <el-descriptions-item label="query">{{ $route.query }}</el-descriptions-item>
    <el-descriptions-item label="params">{{ $route.params }}</el-descriptions-item>
  </el-descriptions>
</template>

<script setup>
</script>

<style scoped></style>
SubView2.vue
<template>
  <el-descriptions title="SubView2" style="padding: 10px;" border>
    <el-descriptions-item label="name">{{ $route.name }}</el-descriptions-item>
    <el-descriptions-item label="path">{{ $route.path }}</el-descriptions-item>
    <el-descriptions-item label="fullPath">{{ $route.fullPath }}</el-descriptions-item>
    <el-descriptions-item label="query">{{ $route.query }}</el-descriptions-item>
    <el-descriptions-item label="params">{{ $route.params }}</el-descriptions-item>
  </el-descriptions>
</template>

<script setup>
</script>

<style scoped></style>
SubView3.vue
<template>
  <el-descriptions title="SubView3" style="padding: 10px;" border>
    <el-descriptions-item label="name">{{ $route.name }}</el-descriptions-item>
    <el-descriptions-item label="path">{{ $route.path }}</el-descriptions-item>
    <el-descriptions-item label="fullPath">{{ $route.fullPath }}</el-descriptions-item>
    <el-descriptions-item label="query">{{ $route.query }}</el-descriptions-item>
    <el-descriptions-item label="params">{{ $route.params }}</el-descriptions-item>
    <el-descriptions-item label="id">{{ id }}</el-descriptions-item>
  </el-descriptions>
</template>

<script setup>
const props = defineProps(['id']);
</script>

<style scoped></style>params传参:(省略了路由注册):
<template>
  <el-tooltip class="box-item" effect="dark"
    content="router.push({ name: 'RouterDemoSubView1WithId', params: { id: 1 } })" plaent="top">
    <el-button type="danger" style="margin: 0 10px;" link
      @click="router.push({ name: 'RouterDemoSubView1WithId', params: { id: 1 } })">
      SubView1(params传参)
    </el-button>
  </el-tooltip>
  <el-tooltip class="box-item" effect="dark" content="router.push({ path: currentPath + '/Siew1/2' })"
    placement="top">
    <el-button type="danger" style="margin: 0 10px;" link
      @click="router.push({ path: currentPath + '/SubView1/2' })">
      SubView1(params传参)
    </el-button>
  </el-tooltip>
</template>query传参:(省略了路由注册):
<el-tooltip class="box-item" effect="dark" content='to="/SubView2?id=1"' plaent="top">
  <router-link :to="currentPath + '/SubView2?id=1'">SubView2(query传参)</router-link>
</el-tooltip>
<el-tooltip class="box-item" effect="dark" content='to="{ path: currentPath + "/Siew2", query: { id: 2 } }'
  placement="top">
  <router-link :to="{ path: currentPath + '/SubView2', query: { id: 2 } }">View2(query传参)</router-link>
</el-tooltip>
props 映射(仅适用params传参):
<el-tooltip class="box-item" effect="dark" content='router中props:true' plaent="top">
  <router-link :to="currentPath + '/SubView3/3'">SubView3(props传参)</router-link>
</el-tooltip>
嵌套路由
Vue 的**嵌套路由(Nested Routes)**允许你在一个页面中嵌套多个子路由组件,,在一个父组件的 <router-view> 中,再嵌套子组件的 <router-view>,实现多层页面嵌套显示, 用于构建具有层级结构的页面。
路由配置示例(嵌套结构)
import { createRouter, createWebHistory } from 'vue-router'

const routes = [
  {
    path: '/user',
    component: () => import('./views/UserLayout.vue'), // 父组件
    children: [
      {
        path: 'profile',
        component: () => import('./views/UserProfile.vue') // 子组件
      },
      {
        path: 'posts',
        component: () => import('./views/UserPosts.vue')
      }
    ]
  }
]

const router = createRouter({
  history: createWebHistory(),
  routes
})

export default router
组件结构
UserLayout.vue(父组件)
<template>
  <div>
    <h2>用户中心</h2>
    <router-link to="/user/profile">个人资料</router-link>
    <router-link to="/user/posts">文章列表</router-link>

    <!-- 嵌套路由出口 -->
    <router-view />
  </div>
</template>
UserProfile.vue
<template>
  <div>这是用户的个人资料页面</div>
</template>
UserPosts.vue
<template>
  <div>这是用户的文章列表页面</div>
</template>
访问效果
| 访问路径 | 渲染内容 |
|---|---|
/user | 仅显示 UserLayout.vue,没有子路由内容 |
/user/profile | 显示 UserLayout.vue + UserProfile.vue |
/user/posts | 显示 UserLayout.vue + UserPosts.vue |
默认子路由(index)
你可以添加一个空路径来定义默认子页面:
{
  path: '',
  component: () => import('./views/UserHome.vue') // 默认子页
}
当访问 /user 时会自动跳转或渲染这个子组件。
多级嵌套示意图
<App>
  └── <router-view>          // 一级
        └── <router-view>    // 二级
              └── <router-view> // 三级...
每一级的组件都要包含一个 <router-view> 来显示子路由组件。
命名视图
Vue Router 的 命名视图(Named Views) 是一种强大的功能,可以让你在一个页面中 同时显示多个组件在不同的位置,而不是像默认那样只能通过一个 <router-view> 来渲染一个组件。
示例:
ContantView.vue
<template>
  <el-descriptions style="padding: 10px;" border>
    <el-descriptions-item label="name">{{ $route.name }}</el-descriptions-item>
    <el-descriptions-item label="path">{{ $route.path }}</el-descriptions-item>
    <el-descriptions-item label="fullPath">{{ $route.fullPath }}</el-descriptions-item>
    <el-descriptions-item label="query">{{ $route.query }}</el-descriptions-item>
    <el-descriptions-item label="params">{{ $route.params }}</el-descriptions-item>
  </el-descriptions>
</template>

<script setup>
import { ref, computed, onMounted } from 'vue';

const props = defineProps();

const emits = defineEmits();

onMounted(() => {

});

</script>

<style scoped></style><template>
<div class="footer">
<p>@footer1</p>
</div>
</template>
<script setup>
import { ref, computed, onMounted } from 'vue';
const props = defineProps();
const emits = defineEmits();
onMounted(() => {
});
</script>
<style scoped>
.footer {
background-color: darkblue;
color: aliceblue;
text-align: center;
height: 20px;
}
.footer p {
margin: 0;
font-size: 12px;
font-weight: bold;
line-height: 20px;
}
</style>FooterView2.vue
<template>
  <div class="footer">
    <p>@footer2</p>
  </div>
</template>

<script setup>
import { ref, computed, onMounted } from 'vue';

const props = defineProps();

const emits = defineEmits();

onMounted(() => {

});

</script>

<style scoped>
.footer {
  background-color: lightsalmon;
  color: black;
  text-align: center;
  height: 20px;
}

.footer p {
  margin: 0;
  font-size: 12px;
  font-weight: bold;
  line-height: 20px;
}
</style>
HeaderView1.vue
<template>
  <div class="header">
    <p>
      标题1
    </p>
  </div>
</template>

<script setup>
import { ref, computed, onMounted } from 'vue';

const props = defineProps();

const emits = defineEmits();

onMounted(() => {

});

</script>

<style scoped>
.header {
  background-color: darkblue;
  color: aliceblue;
  text-align: center;
  height: 60px;
}

.header p {
  margin: 0;
  line-height: 60px;
  font-size: large;
  font-weight: bold;
}
</style>
HeaderView2.vue
<template>
  <div class="header">
    <p>
      标题2
    </p>
  </div>
</template>

<script setup>
import { ref, computed, onMounted } from 'vue';

const props = defineProps();

const emits = defineEmits();

onMounted(() => {

});

</script>

<style scoped>
.header {
  background-color: lightsalmon;
  color: black;
  text-align: center;
  height: 60px;
}

.header p {
  margin: 0;
  line-height: 60px;
  font-size: large;
  font-weight: bold;
}
</style>
切换
    <div class="router-main">
      <div class="router-header">
        <!-- 使用el-menu -->
        <el-menu mode="horizontal" background-color="#545c64" text-color="#fff" active-text-color="#ffd04b" router>
          <el-menu-item :index="currentPath + '/View1'">View1</el-menu-item>
          <el-menu-item :index="currentPath + '/View2'">View2</el-menu-item>
        </el-menu>
      </div>
      <div class="router-contant">
        <div class='n-header'>
          <RouterView name="header" />
        </div>
        <div class='n-contant'>
          <RouterView name="contant" />
        </div>
        <div class='n-footer'>
          <RouterView name="footer" />
        </div>
      </div>
    </div>
效果:
路由守卫
Vue Router 的**路由守卫(Navigation Guards)**是控制页面跳转过程中的一系列钩子函数,常用于:
- ✅ 权限验证(是否登录)
- ✅ 页面切换前确认(如保存数据)
- ✅ 日志/埋点
- ✅ 动态更改标题/设置 meta
| 类型 | 说明 | 注册位置 |
|---|---|---|
| 全局守卫 | 应用级别的导航控制 | router 实例上 |
| 路由独享守卫 | 单个路由独立控制 | 路由配置中 |
| 组件内守卫 | 组件级别控制 | 组件内部 |
- 全局守卫
beforeEach(跳转前)
router.beforeEach((to, from, next) => {
  if (to.meta.requiresAuth && !isLoggedIn()) {
    next('/login') // 拦截跳转
  } else {
    next() // 放行
  }
})
afterEach(跳转后)
router.afterEach((to, from) => {
  console.log(`已从 ${from.path} 跳转到 ${to.path}`)
})- 路由独享守卫
直接写在路由配置中:
{
  path: '/admin',
  component: AdminView,
  beforeEnter: (to, from, next) => {
    if (hasAdminRights()) {
      next()
    } else {
      next('/403')
    }
  }
}- 组件内守卫(仅适用于路由组件)
Vue 3 <script setup> 中使用组合式 API:
import { onBeforeRouteLeave, onBeforeRouteUpdate } from 'vue-router'

onBeforeRouteLeave((to, from) => {
  const answer = window.confirm('确定要离开吗?未保存的数据将丢失!')
  if (!answer) return false
})

onBeforeRouteUpdate((to, from) => {
  console.log('路径参数变化时触发,比如 /user/1 -> /user/2')
})- 守卫调用顺序(导航流程)
1. 全局 beforeEach
2. 路由 beforeEnter
3. 组件 beforeRouteLeave(离开当前组件)
4. 组件 beforeRouteUpdate(参数变化)
5. 渲染组件
6. 全局 afterEach
守卫中 next() 用法(Vue 3 中不需要 next)
在 Vue 2 中,你必须调用 next():
next()           // 继续跳转
next('/login')   // 跳转其他页面
next(false)      // 阻止跳转
在 Vue 3 中,守卫中可以直接返回:
return true       // 放行
return false      // 中断
return '/login'   // 重定向
高级匹配
Vue Router 的 高级匹配(Advanced Matching),是指在配置路由时使用一些增强语法,能更灵活地匹配 URL,满足复杂场景下的需求
| 匹配方式 | 路由配置示例 | 匹配效果 |
|---|---|---|
| 动态参数 | /user/:id | /user/123 |
| 可选参数(变通) | /product/:id 和 /product | /product 和 /product/1 |
| 通配符匹配 | /files/:pathMatch(.*)* | /files/a/b/c.txt |
| 自定义正则匹配 | /order/:id(\\d+) | /order/123 |
| 命名视图 | { components: { default, sidebar }} | 多 <router-view name="xxx" /> |
| 重定向/别名 | { path: '/home', redirect: '/' } | 跳转路径或别名 |
实践
项目地址:https://github.com/chenrui1996/vue-demo
- 基于 menuthree实现配置化菜单
效果:
- 自动扫描pages文件夹内页面并自动加载路由(可以嵌套在任意路由中)
Pinia
Pinia 是 Vue.js 官方推荐的状态管理库,是 Vuex 的后继者。Pinia 提供了更简单、更类型安全、更轻量的 API,用于在 Vue 应用中集中管理组件之间的共享状态。
使用方式:
- 安装 Pinia
npm install pinia- 在 Vue 应用中注册:
main.js
import { createPinia } from 'pinia'
///持久化插件
import piniaPluginPersistedstate from 'pinia-plugin-persistedstate'

const app = createApp(App)

app.use(createPinia().use(piniaPluginPersistedstate))- 使用
<template>
  <div>
    <el-card>
      <template #header>
        父组件
      </template>
      <el-button type="success" @click="userStore.login(generateUser(), faker.internet.jwt())">
        登录
      </el-button>

      <el-button type="primary" @click="updateUserStore">
        更新
      </el-button>

      <el-button type="primary" @click="updateUser">
        更新user(解构结果)
      </el-button>

      <el-button type="warning" @click="replace">
        替换
      </el-button>

      <el-button type="danger" @click="logoutUser">
        重置
      </el-button>

      <el-button type="success" @click="subscribe">
        订阅
      </el-button>

      <el-button type="danger" @click="unsubscribe">
        取消订阅
      </el-button>
      <el-descriptions title="当前用户:" style="padding: 10px;" border>
        <el-descriptions-item v-for="(value, key) in user" :key="key" :label="key">{{ value }}</el-descriptions-item>
        <el-descriptions-item label="token">
          <template #default>
            <el-tooltip class="box-item" effect="dark" :content="token">
              <template #content>
                <div style="word-break: break-all;  width: 200px;">
                  {{ token }}
                </div>
              </template>
              <div class="ellipsis-text">
                {{ token }}
              </div>
            </el-tooltip>
          </template>
        </el-descriptions-item>
      </el-descriptions>
    </el-card>
    <br />
    <el-card>
      <template #header>
        子组件1
      </template>
      <PiniaView1 />
    </el-card>
    <br />
    <el-card>
      <template #header>
        子组件2
      </template>
      <PiniaView2 />
    </el-card>
  </div>
</template>

<script setup>
import { watch, onMounted } from 'vue'
import { useUserStore } from '@/store'
import { storeToRefs } from 'pinia'
import { faker } from '@faker-js/faker'
import { ElMessage } from 'element-plus'
import { stringify } from 'flatted'

import PiniaView1 from './PiniaViews/PiniaView1.vue'
import PiniaView2 from './PiniaViews/PiniaView2.vue'


const userStore = useUserStore()
// storeToRefs后的结构结果,可以实现与store的响应式关联
const { user, token } = storeToRefs(userStore)

function generateUser() {
  return {
    id: faker.string.uuid(),
    name: faker.person.fullName(),
    email: faker.internet.email(),
    role: 'admin',
    isActive: true
  }
}

onMounted(() => {
  userStore.login(generateUser(), faker.internet.jwt())
})

// 更新
// 也可以使用userStore.$patch()
function updateUserStore() {
  userStore.updateUser({ name: faker.person.fullName(), email: faker.internet.email() })
}

// storeToRefs后的结构结果,可以实现与store的响应式关联
function updateUser() {
  user.value.name = faker.person.fullName()
}

// 重置
function logoutUser() {
  userStore.logout()
}

// 替换整个 state(不推荐但可用)
function replace() {
  userStore.$state = {
    user: generateUser(),
    token: faker.internet.jwt()
  }
}

// 订阅
let unsubscribeTemp = null

// 类似于 Vuex 的 subscribe 方法,你可以通过 store 的 $subscribe() 方法侦听 state 及其变化。
// 比起普通的 watch(),使用 $subscribe() 的好处是 subscriptions 在 patch 后只触发一次
function subscribe() {
  unsubscribeTemp = userStore.$subscribe((mutation, state) => {
    if (mutation === undefined || state === undefined) {
      return
    }
    ElMessage.info(`用户状态变化: \r\n storeId - ${stringify(mutation.storeId)}, \r\n user - ${stringify(state.user)}`)
  })
}

// 取消订阅
// 当组件被卸载时,它将被自动清理掉。除非 detached 被设置为 true
function unsubscribe() {
  unsubscribeTemp()
}

</script>

<style scoped>
.ellipsis-text {
  max-width: 200px;
  overflow: hidden;
  white-space: nowrap;
  text-overflow: ellipsis;
}
</style>
http请求
在 Vue 中,常见的 HTTP 请求方式主要有以下几种,通常会搭配第三方库如 axios 或浏览器原生的 fetch 来发起请求:
Axios(推荐)
- 安装:
npm install axios- 使用示例:
import axios from 'axios'

axios.get('/api/users')
  .then(response => {
    console.log(response.data)
  })
  .catch(error => {
    console.error(error)
  })

axios.post('/api/users', {
  name: 'Rui',
  age: 25
})- 在 Vue 组件中使用:
<script setup>
import axios from 'axios'
import { onMounted, ref } from 'vue'

const users = ref([])

onMounted(async () => {
  const res = await axios.get('/api/users')
  users.value = res.data
})
</script>
原生 Fetch API(轻量、现代浏览器支持)
示例:
fetch('/api/users')
  .then(res => res.json())
  .then(data => console.log(data))
  .catch(err => console.error(err))

fetch('/api/users', {
  method: 'POST',
  headers: { 'Content-Type': 'application/json' },
  body: JSON.stringify({ name: 'Rui' })
})
⚠️
fetch不会自动抛出网络错误,也不会自动处理 JSON 序列化失败、状态码非 2xx 错误。